A Return Merchandise Authorisation (RMA) records goods a customer is sending back to you, from first contact through to receipt and credit. It covers the groundwork an administrator does once - the reasons list and the Returns settings - then raising a return, putting the right items on it, giving each a reason, and authorising it.
The rest of the set picks up where this one stops: Returns (RMAs): receiving items back and deciding what happens to them (opens in a new tab), Returns (RMAs): credit notes, refunds and replacement orders (opens in a new tab), Returns (RMAs): the customer pack, the RMA document and return labels (opens in a new tab) and Returns (RMAs): the Returns report (opens in a new tab).
1. What a return is, and what it is not
Returns live at Outbound > Returns, between Items & Deliveries and Reporting. Each one covers a single customer and gets its own Reference automatically, in the form RMA plus five digits - RMA00042. That is the number to quote to the customer, and it cannot be typed over. Its items are not typed in either: they are chosen from what was actually dispatched, so nothing can be returned that was never received.
Two buttons look like returns and are not. Send Items Back to Customer is on a processed collection or drop-off, and sends goods from that job back out to the customer who brought them. Write Off Items From Stock, on every kind of transfer and limited to stock managers, removes items from stock as lost, damaged or unusable. For items coming back to you, always start at Outbound > Returns.
2. Setting up your Return Reasons (administrators)
Do this first, because a return cannot be authorised until every item on it has a reason. Reasons live at Outbound > Configuration > Return Reasons, administrators only. The first column is a drag handle rather than a value; then comes Reason, and after it Built In, No. Return Lines and Active, which are optional columns you can switch off from the columns control at the end of the header row.
Six ship as standard - Dead on arrival, Warranty fault, Wrong item shipped, Customer remorse, Not as described and Quality concern - and the same list is offered on every item of every return whatever its Type. Drag a row by its handle to set the order the dropdown offers them in. Add your own for anything you track separately, but keep the list short.
- No reason can be deleted once any return line uses it, cancelled returns included, and the six built-in ones can never be deleted at all. Untick Active instead: the reason goes from new returns, and returns already using it keep it.
- Two active reasons cannot share a name, ignoring capitals and spare spaces. Told a name is taken but cannot see it? It is archived - clear the Active filter.
3. The Returns settings (administrators)
Six settings sit under Users & Settings > Settings > Sales > Returns.
- Default Return Window (days) - days after dispatch within which a return is not flagged as late. A new system starts at 30; an existing one keeps what it has, blank included. Blank switches the check off.
- RMA Processing Target (days) - authorising a return stamps its Deadline this many days ahead. Blank means no automatic deadline; you can still type one in.
- Default Restocking Fee (%) - deducted from return credit notes to cover handling. Blank means no fee; it is overridable per customer and per return.
- Return Instructions - printed verbatim on every RMA document. Blank it and that section drops off.
- Auto-send RMA email on authorise - off unless you switch it on. While on, Authorise puts the customer's email straight into the outgoing mail queue, so it leaves on the next run of that queue rather than the instant you press the button.
- RMA Email Template - the email both sending routes start from. Leave it on RMA - Return authorisation to use the wording RecyclyERP ships, or duplicate that template and pick your own copy here.
The window is also set per customer and per order, and section 7 explains how the three levels fit together.
4. Three ways to raise a return
- Outbound > Returns, then New, when you do not yet know which order the goods came from. You pick the customer yourself.
- On an outbound sales order, Create Return, immediately after the Create Invoice pair. Best when they have quoted an order number.
- On a processed outgoing delivery, Create Return, narrowed to that delivery. Best when they have quoted a delivery note.
The two Create Return routes land on the same form with the customer already filled in. That button only shows while something on the order or delivery is still returnable, so it goes once everything is on a live return; cancelling a return brings it back. Separately, a Returns button appears at the top right as soon as the first return exists, counting how many there are.
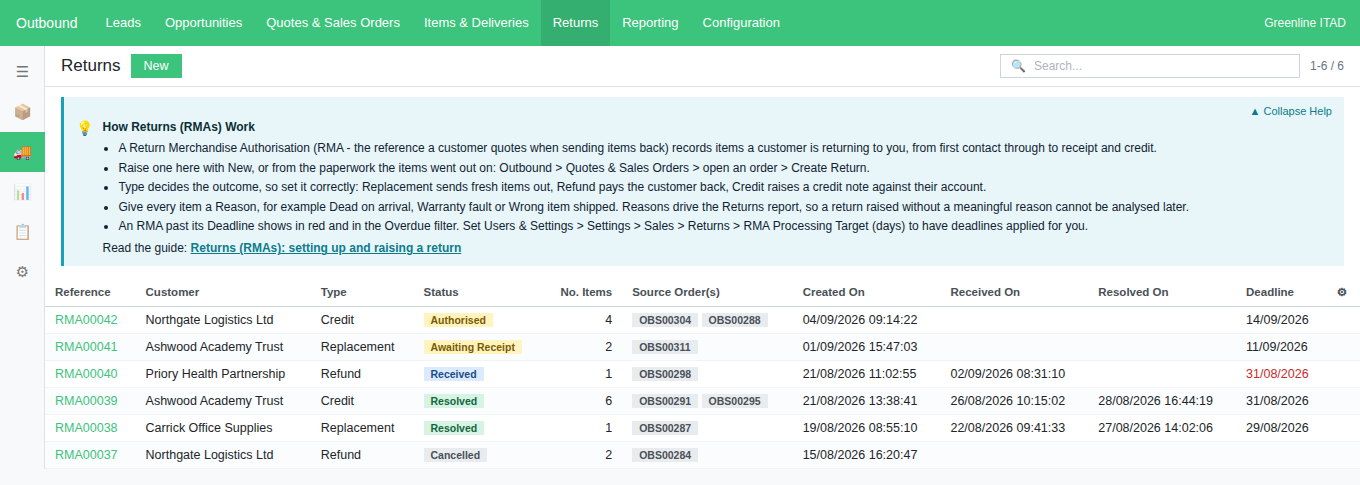
On the list, Deadline turns red once it has passed and the return is not yet Resolved or Cancelled; a return with no deadline is never late. Filter by Overdue, My Returns, Open or Resolved, and group by Customer, Type, Status or Created On.
5. Choosing the customer and adding what is coming back
Customer is required and can only be set while the return is in Draft, so the tick beneath it, Only customers with items still to return, goes once the return moves on. It is ticked to start with; untick it to search every company.
Set Type next, because it decides which buttons you get later: Replacement sends fresh items out, Refund pays the customer back, Credit raises a credit note against their account. It arrives as Replacement, or as Refund where the return was raised from a sales order, stays editable in Draft and Authorised, then locks. Comments is free text.
Now the items. At the foot of the Items list is an add link reading Add Items, which opens a picker titled Add Items to Return rather than adding a blank row. It offers only the quantity still available to return, in columns Add, Item/Lot, Product, Source Order, Delivery, Dispatched Date and Return Quantity. Tick what is coming back, adjust Return Quantity if only part of a lot is going back, then press Add Items. Raise the return from an order and Limit to Order arrives filled in with it; clear that box to see everything else still returnable for the customer.
An empty picker is not a fault - the items were dispatched, they are just already spoken for. With Limit to Order filled in it reads: Nothing left to add from this order. Everything dispatched on it has already been returned, or is on another return that has not been cancelled. Clear "Limit to Order" above to see this customer's other orders. Without one it says instead that nothing has been dispatched to this customer yet, or everything that was is already on a live return.
Back on the return, only Quantity and Reason can be edited on a row, and an item comes off the return by deleting its row from the Items list. Both stop being possible once that line has been received, because the goods are in stock by then.
6. Giving every item a Reason, and authorising
Every item needs a Reason before the return can leave Draft. Set them one at a time in the Reason column, or use Set Reason at the top for several at once: it opens a popup with a Reason picker and a row per item showing its Current Reason, with the ones still missing a reason already ticked. Adjust the ticks and press Set Reason.
Miss one and Authorise names it: "Every item needs a Reason before this return can be authorised. Missing on: ... Press Set Reason at the top. The items still missing one are already ticked for you, so pick the reason and confirm." A return with nothing on it is refused too, with "Add at least one item before authorising this return."
Press Authorise once the return is agreed with the customer. It stamps Authorised On, applies the Deadline from your RMA Processing Target (days), and unlocks the customer pack: Email RMA to Customer, Get Return Label and Documents > RMA Document. Get Return Label is only there where a carrier account is set up, and goes again once a label is attached. With Auto-send RMA email on authorise on, the button asks you to confirm first, because an email cannot be recalled once it has gone.
7. The return window warning
Each item carries its own window, worked out at three levels, first non-blank wins: the sales order's Return Window (days) on its Other Info tab, then the customer's Return Window (days) on their Sales & Purchase tab, then Default Return Window (days) in Settings. All three blank means nothing is ever flagged, and a blank box does not mean "no returns allowed" - the screen says so beside it: "Blank, so this customer uses the system default of 30 days."
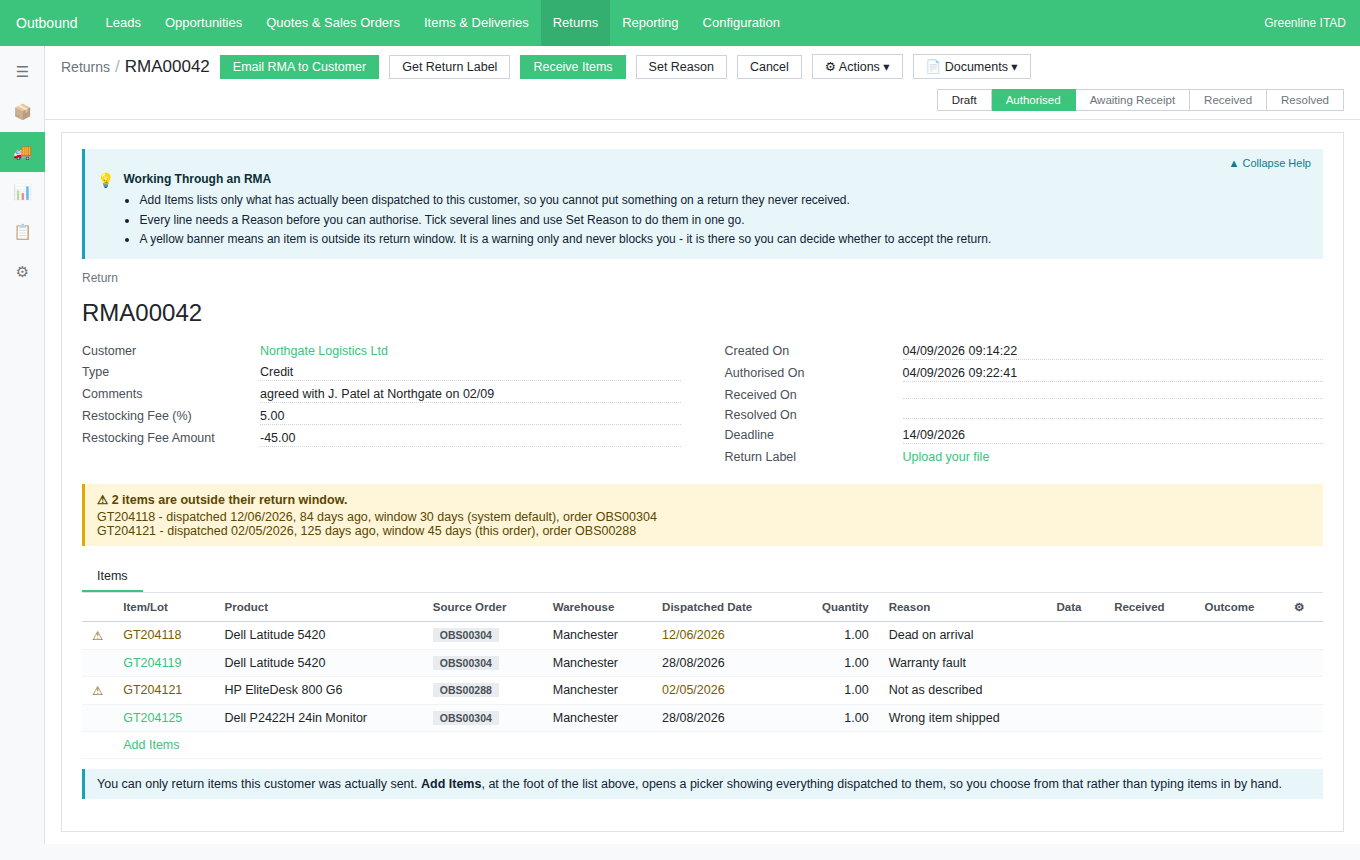
When something is late, a pale yellow panel appears above the Items list with a warning triangle and a count - "1 item is outside its return window." for one, "2 items are outside their return window." for more - then one line per late item:
- GT204118 - dispatched 12/06/2026, 84 days ago, window 30 days (system default), order OBS00304
- GT204121 - dispatched 02/05/2026, 125 days ago, window 45 days (this order), order OBS00288
The phrase in brackets names the level that supplied the number, and is always "this order", "customer terms" or "system default". Up to three late items every line shows outright; above three they fold behind a link reading Show all 7 items with the real number, and each late row in the Items list carries its own warning triangle. The panel is a warning and nothing more: nothing is ever refused because of it, and it stays so anyone opening the return later can see the goods came back late.
8. The status flow, end to end
A return moves Draft, Authorised, Awaiting Receipt, Received, Resolved, with Cancelled alongside, shown on the status bar only when the return is in it. Each step happens through a button that does real work, so a jump made by clicking the status bar is refused, named and snapped back - the one exception being Draft to Authorised, which is routed through Authorise.
Cancel is available in every status except Resolved and Cancelled, and asks "Cancel this return? Its items will become free to be returned again." first. It is refused once any item has been received, because the goods are already in the warehouse. Set to Draft reopens a cancelled return. And a return cannot be deleted once it has left Draft: what was agreed with the customer stays on record, so cancel it instead.
Common problems
- Return Quantity will not accept the number. It has to be more than zero, and cannot exceed what went out less whatever is already on another return that has not been cancelled. The message names all three figures.
- Authorise will not go through. Either an item has no Reason, or the return has no items at all. Both messages say which.