Some of your customers will give you an ADISA DIAL rating, which says how carefully their data-bearing equipment must be handled, and you may hold an ADISA certification of your own. RecyclyERP records both, carries the customer's rating onto every job for them, shows your staff and drivers what each level means for your business, and warns you when a job needs more than you are certified for.
This guide explains what the ratings are, how to switch the feature on or off, how to record your own certification and set up the three DIAL levels, how to record and verify a customer's rating, and where the rating then shows up: on inbound orders and collections, in Driver Hub, on Booking In, on the Customer Portal and on your documents.
1. What ADISA DIAL ratings are, and who sets them
ADISA is the Asset Disposal and Information Security Alliance. DIAL is its Data Impact Assurance Level, part of ADISA's ICT (information and communications technology) Asset Recovery Standard 8.0. There are three levels:
- DIAL 1, the lowest: the customer has rated the risk to their data as low, for example smaller volumes of data that is not confidential.
- DIAL 2, the middle level: the risk is medium, for example personal or business data in larger volumes.
- DIAL 3, the highest: the risk is high, for example a government department, a data centre or a healthcare body. ADISA expects each item to be identified by its serial number or another unique identifier at the customer's site.
The customer decides their rating, not you. They work it out with ADISA's online assessment, and it is printed on their ADISA DIAL certificate together with a unique reference. Your job is to record what they give you and check it is genuine. A customer can rate one of their buildings differently from the rest, for example a data centre rated DIAL 3 under a head office rated DIAL 2, and can ask for one job to be handled at a different level from usual. RecyclyERP covers both.
Your own ADISA certification is a separate thing: it is the highest DIAL level your business, or one of your warehouses, is certified to handle.
2. Switching ADISA DIAL Ratings on or off
The feature is switched on at Users & Settings > Settings > Inbound, under the heading ADISA DIAL Ratings, between "Contracts" and "Asset Valuation & Grading". Only an administrator can change it.
- The ADISA DIAL Ratings tick box switches the whole feature on or off, for every company in your database.
- Under it, while it is ticked, Configure DIAL Levels opens the three DIAL levels (section 4) and Set Our ADISA Certification opens your company's settings (section 3).
- DIAL Warnings holds five tick boxes, one for each warning described in section 9. Each company in a multi-company database sets its own. "No DIAL rating recorded" starts unticked, so jobs for customers you have not yet rated do not all show a warning on day one; the other four start ticked.
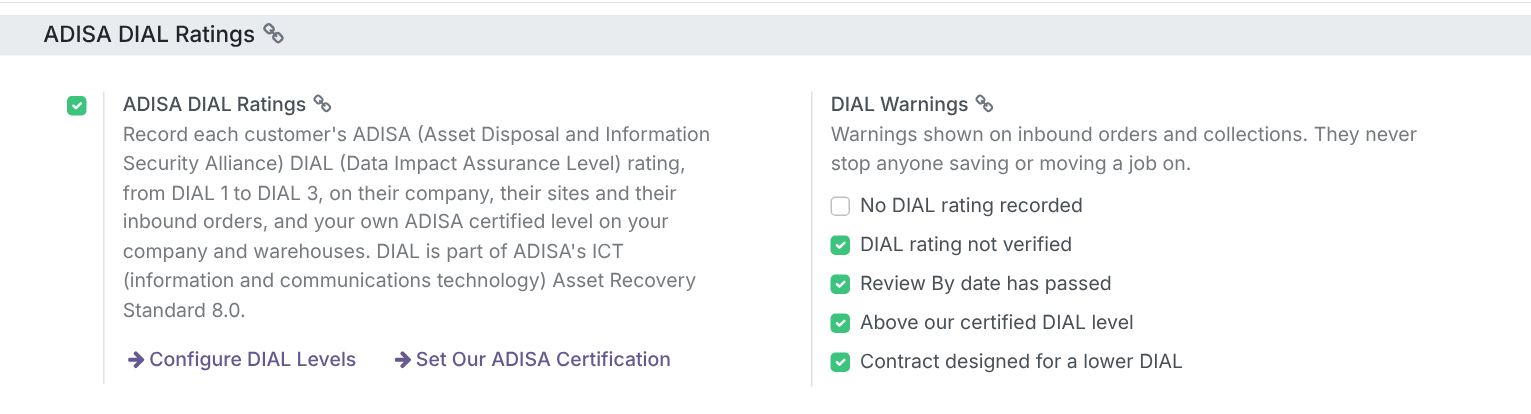
Settings > Inbound: the switch for the whole feature, and the five warnings.
When the feature first reached your database it was switched on for you, once. If an administrator unticks it, a later update never switches it back on.
Switching it off hides everything about DIAL: the tabs, columns, filters, badges and warnings, the DIAL Levels menu item, everything in Driver Hub, on Booking In and on the Customer Portal, the DIAL rows in a Document Template's Commonly Used Fields, and the DIAL line on your documents. Driver Hub scanning goes back to following your Driver Hub settings alone. Nothing you have recorded is deleted, so ticking it again brings everything back exactly as it was.
The Setup Assistant item Set up ADISA DIAL Ratings, under "Services & Contracts Configuration", opens this part of Settings. If you are not ADISA certified and none of your customers give you a DIAL rating, mark it Not Needed and untick ADISA DIAL Ratings.
3. Your own ADISA certification: your company and each warehouse
Your company. Open Users & Settings > Settings > Company Settings and click the Registrations & Certifications tab, or use Set Our ADISA Certification in Settings. The ADISA Certification group sits between "License Numbers & Authorised Signature" and "Registrations & Certifications":
- Certified DIAL Level: the highest DIAL level you are certified to, as printed on your ADISA certificate. Leave it blank, where it reads "Not ADISA certified", if you are not certified.
- ADISA Certificate Number: for example AAC030.
- Certificate Expiry Date: once it has passed, inbound orders and collections show a warning.
Every change is recorded in the company's Log Note, under the form or to its right on a wide screen. If your "Registrations & Certifications" list already held a line such as "ADISA Standard 8.0, DIAL 3" when the feature arrived, Certified DIAL Level was filled in from it, and the Log Note says so.
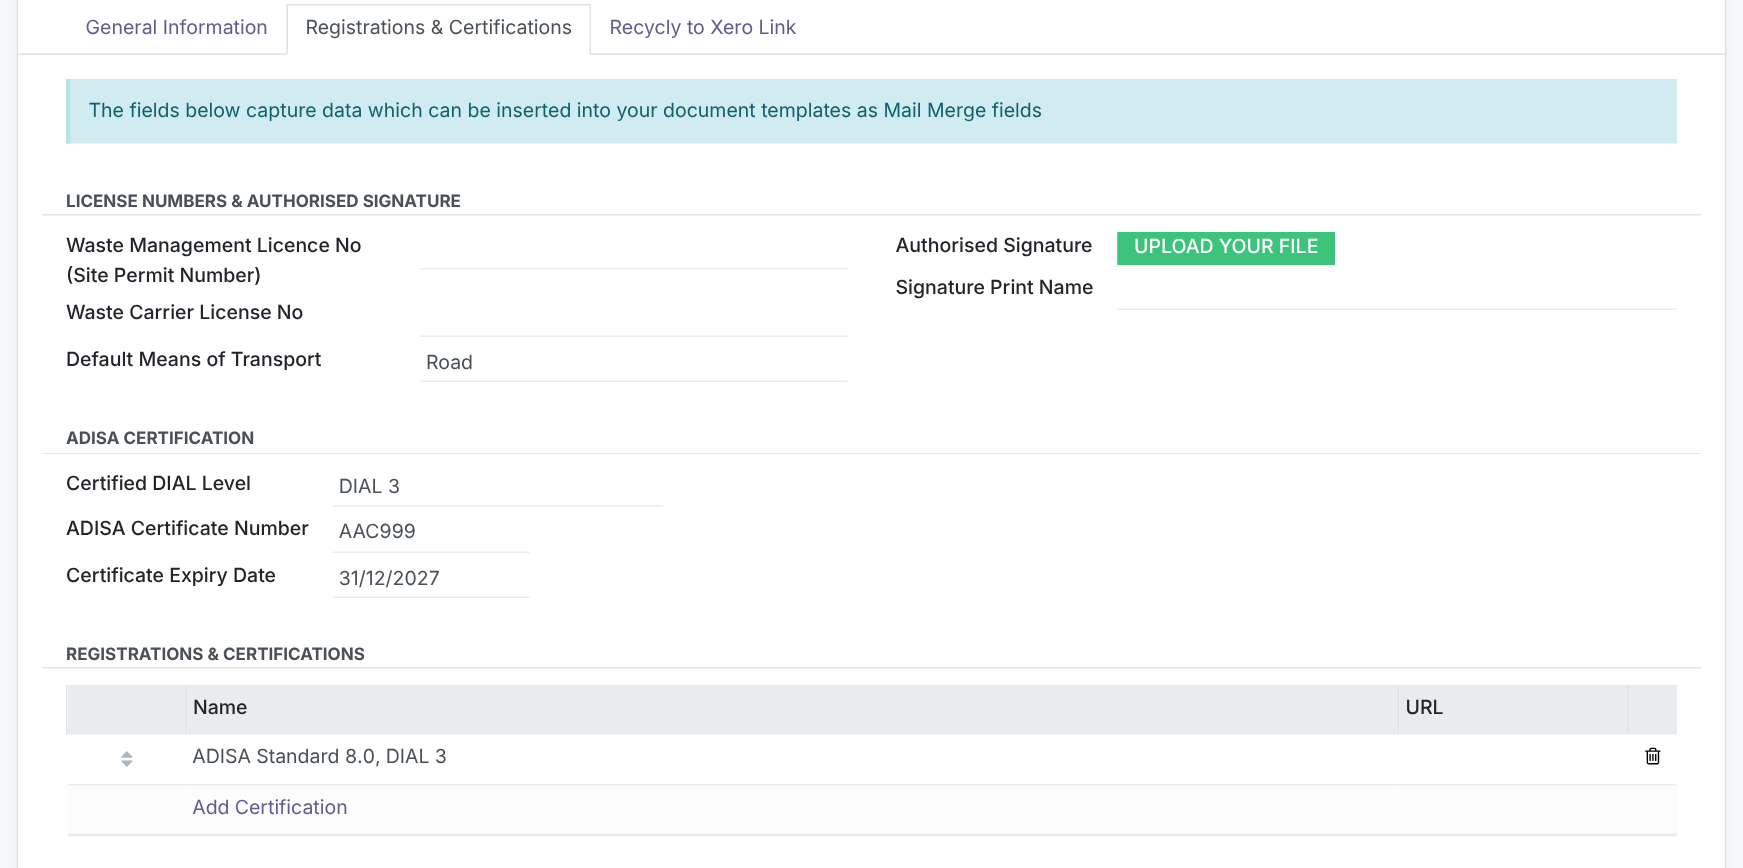
Your company's ADISA certification, on Company Settings.
Each warehouse. ADISA certifies each site separately, so two of your warehouses can hold different levels. Open Inbound > Configuration > Logistics & Inventory > Warehouses, open a warehouse and click its ADISA Certification tab, after "Locations".
- Use Company's ADISA Certification is ticked to start with. While it is ticked, one line shows what the warehouse is using, for example "Using Pellbridge Asset Recovery Ltd's certification: DIAL 3, certificate AAC030, expires 24/02/2027."
- Untick it when ADISA has certified this warehouse at a different level. The same three boxes as on the company then appear, for this warehouse alone.
- The Warehouses list has an ADISA DIAL Level column, hidden to start with, which you add from the column chooser.

A warehouse with an ADISA certification of its own.
Only administrators can change your company's or a warehouse's ADISA certification. Anyone else sees it read-only. Every check against "our certified level" uses the level of the warehouse concerned (section 9).
4. Setting up the DIAL Levels
Open Inbound > Configuration > Contracts > DIAL Levels, or Configure DIAL Levels in Settings. The list always holds exactly three rows, DIAL 1, DIAL 2 and DIAL 3. The levels are fixed by ADISA, so they cannot be added to, deleted or renamed. What each one means for your business is yours to set, and the three levels are shared by every company in your database.
- What It Means: a plain-English description of the level, for your staff. It starts with the wording in section 1, and you can change it.
- Handling Instructions: what your staff and drivers must do for a customer at this level, in up to 300 characters. They show on inbound orders, collections and Booking In, and in Driver Hub if "Show in Driver Hub" is ticked. Leave them blank to show nothing. DIAL 3 starts with "Label every item and scan it at the customer's site, then scan it again when it arrives at the warehouse."; DIAL 1 and DIAL 2 start blank.
- Show in Driver Hub: shows the level and its handling instructions to the driver on the collection.
- Scanning in Driver Hub: "Follow the Driver Hub setting", or "Required - the driver cannot skip it", which takes the Skip scanning button away on jobs that list individual items. DIAL 3 starts at Required.
- Scan Button on Summary Jobs: "Follow the Driver Hub setting", or "Always show it", which puts the scan button on summary jobs at this level even where your company has switched it off. DIAL 3 starts at Always show it.
- Show Badge on Cards: a small DIAL badge on inbound order and collection cards, the Route Planning board and the Driver Hub list. Ticked on all three to start with.
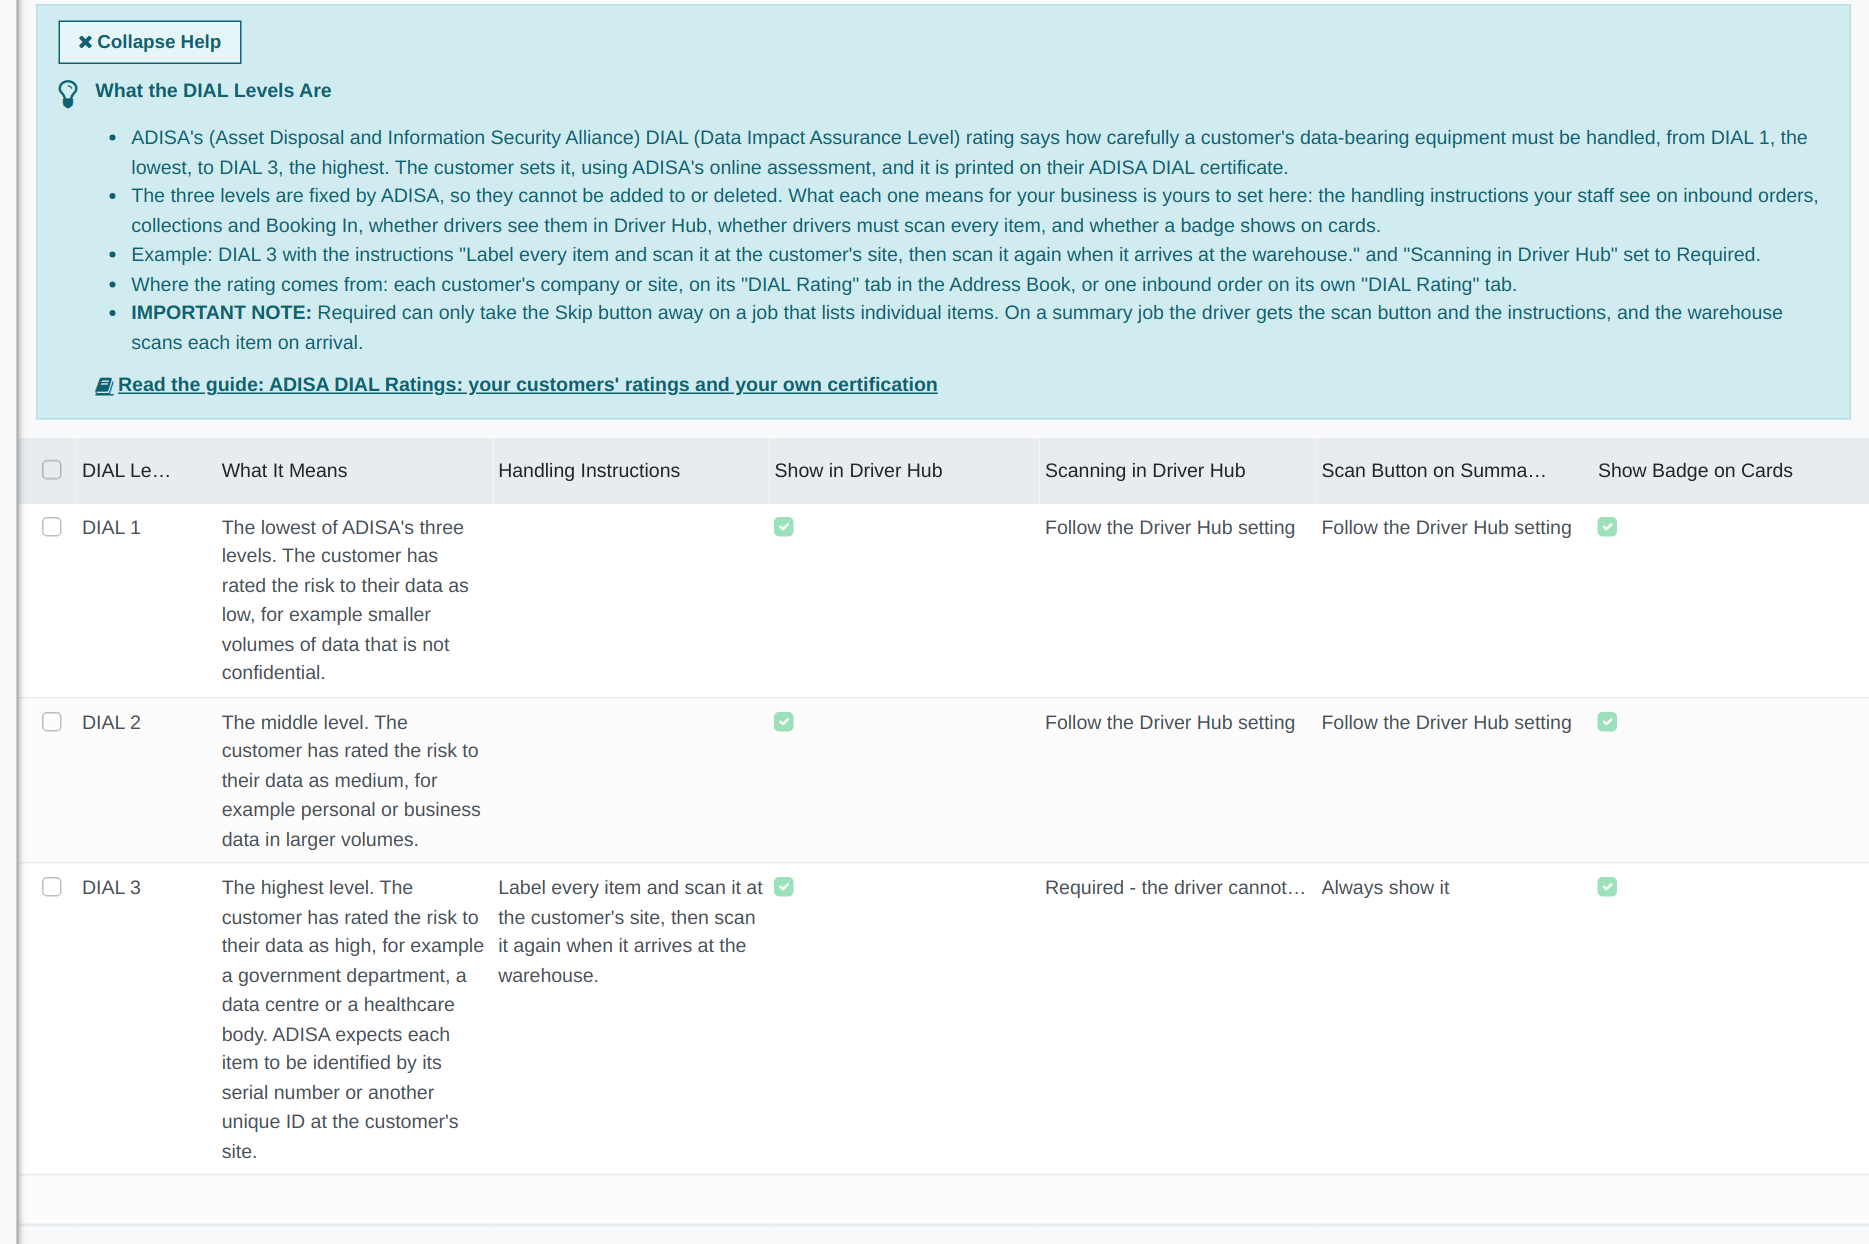
The three DIAL levels, and what each one means for your business.
Click a row to open it, or tick several rows to change one column for all of them at once. Every change is recorded in the level's Log Note with the old and new value. Only administrators can change the levels; everyone else can read them.
Section 11 explains exactly what the two scanning settings can and cannot do in Driver Hub.
5. Recording and verifying a customer's DIAL rating
Open the customer at Address Book > Companies & Contacts and click the DIAL Rating tab, between "Site Details" and "Contracts". Companies and sites have it; people and ad hoc addresses do not, because they have no DIAL rating of their own.
The tab has two groups. Customer's DIAL Rating on the left:
- DIAL Rating: DIAL 1, DIAL 2 or DIAL 3, as printed on the customer's certificate. It reads "Not recorded" while blank.
- DIAL Reference: the unique reference on the certificate, for example DIAL-58210-CLAY. You need it to check the rating on the ADISA portal.
- DIAL Certificate: a copy of the certificate, or of the customer's written confirmation, as a PDF document or a PNG or JPEG picture of 10 MB or less. Anything else shows "The DIAL Certificate must be a PDF or image of 10 MB or less." Only people who can open this customer's record can download it.
Verification on the right:
- How Verified: "Checked on the ADISA portal" or "Written confirmation from the customer". ADISA accepts only these two. A phone call does not count.
- Verified On fills with today's date when you choose How Verified, and you can change it. It cannot be a future date: "Verified On cannot be in the future."
- Verified By fills with your name and cannot be typed in.
- Review By is optional: the date by which you will check the rating is still current. From the day after it, the customer's inbound orders and collections show a warning.
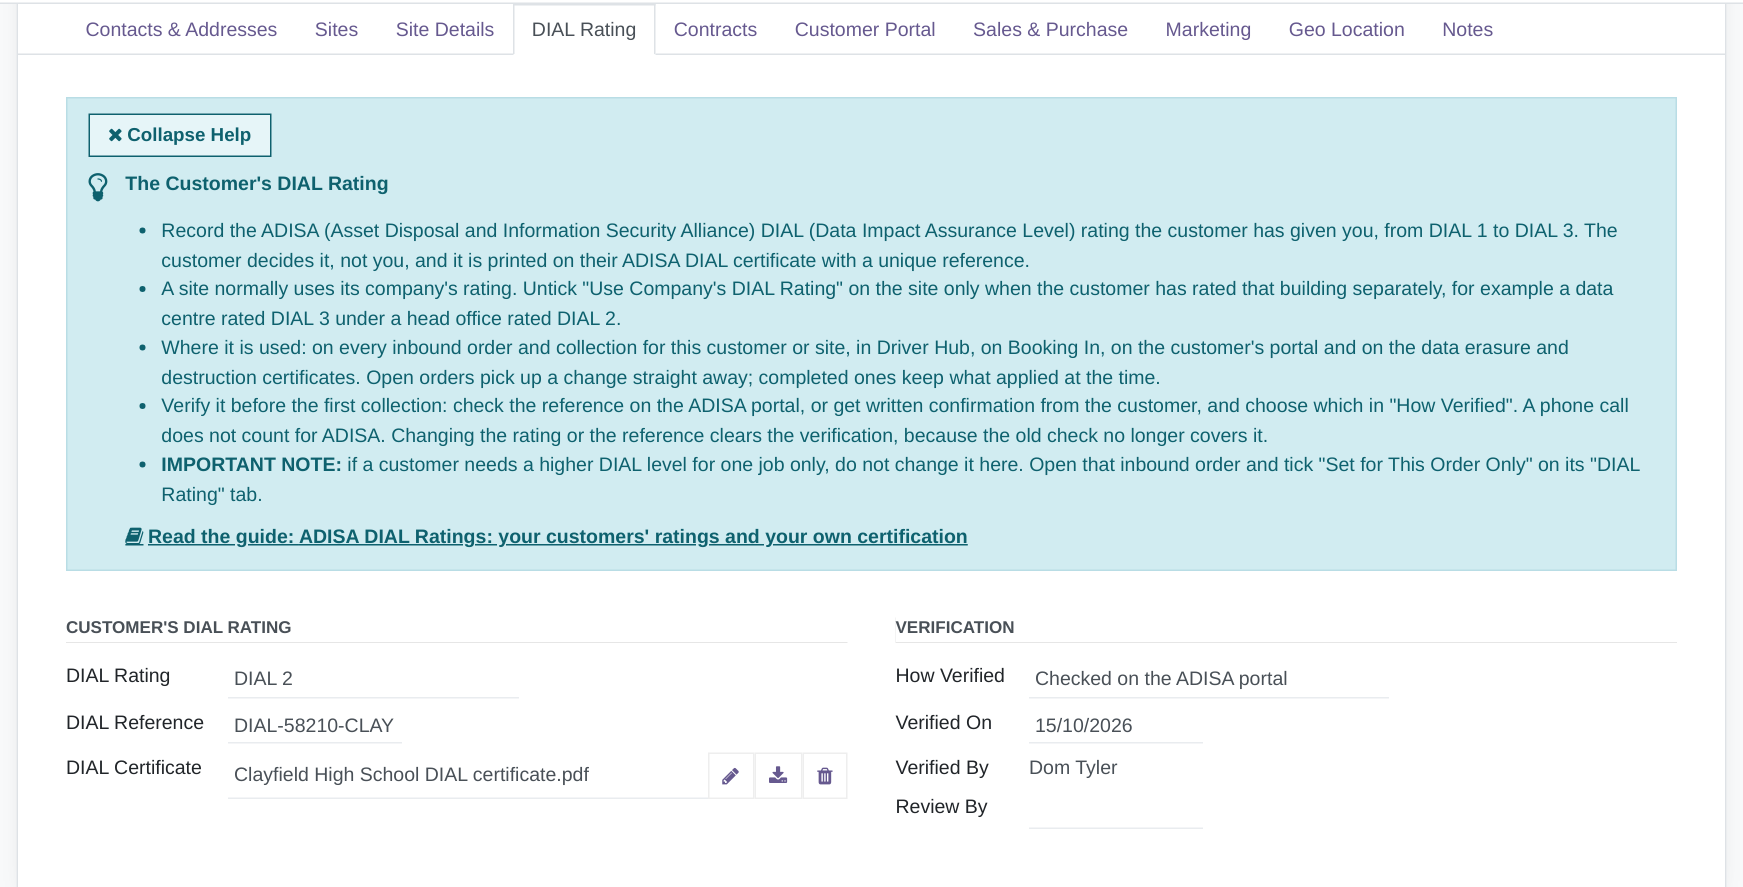
A customer's DIAL rating, recorded and verified.
Verify it before the first collection. Check the reference on the ADISA portal, or get written confirmation from the customer, then choose which in How Verified.
Changing the rating or the reference clears the verification, because the old check no longer covers it. How Verified, Verified On and Verified By empty themselves as soon as you make the change, before you save, and the Log Note records the clearing on the same line as the change, for example "DIAL Rating: DIAL 2 > DIAL 3. Verification cleared because the rating changed." If you choose How Verified again before saving, the new verification is kept. Uploading or replacing the certificate on its own does not clear anything.
Every change on the tab is recorded in the customer's Log Note with the old and new value, including the certificate being uploaded, replaced or removed. You do not need to be an administrator to record, change or verify a customer's rating.
6. Sites: using the company's rating, or their own
A site normally uses its company's rating. On a site's DIAL Rating tab, Use Company's DIAL Rating is ticked to start with, and the two groups are replaced by one line saying what the site is using, for example:
- "Using Clayfield High School's rating: DIAL 2, reference DIAL-58210-CLAY, checked on the ADISA portal on 15/10/2026."
- "Using Clayfield High School's rating: DIAL 2, not verified yet."
- "Using Clayfield High School's rating: none recorded yet."
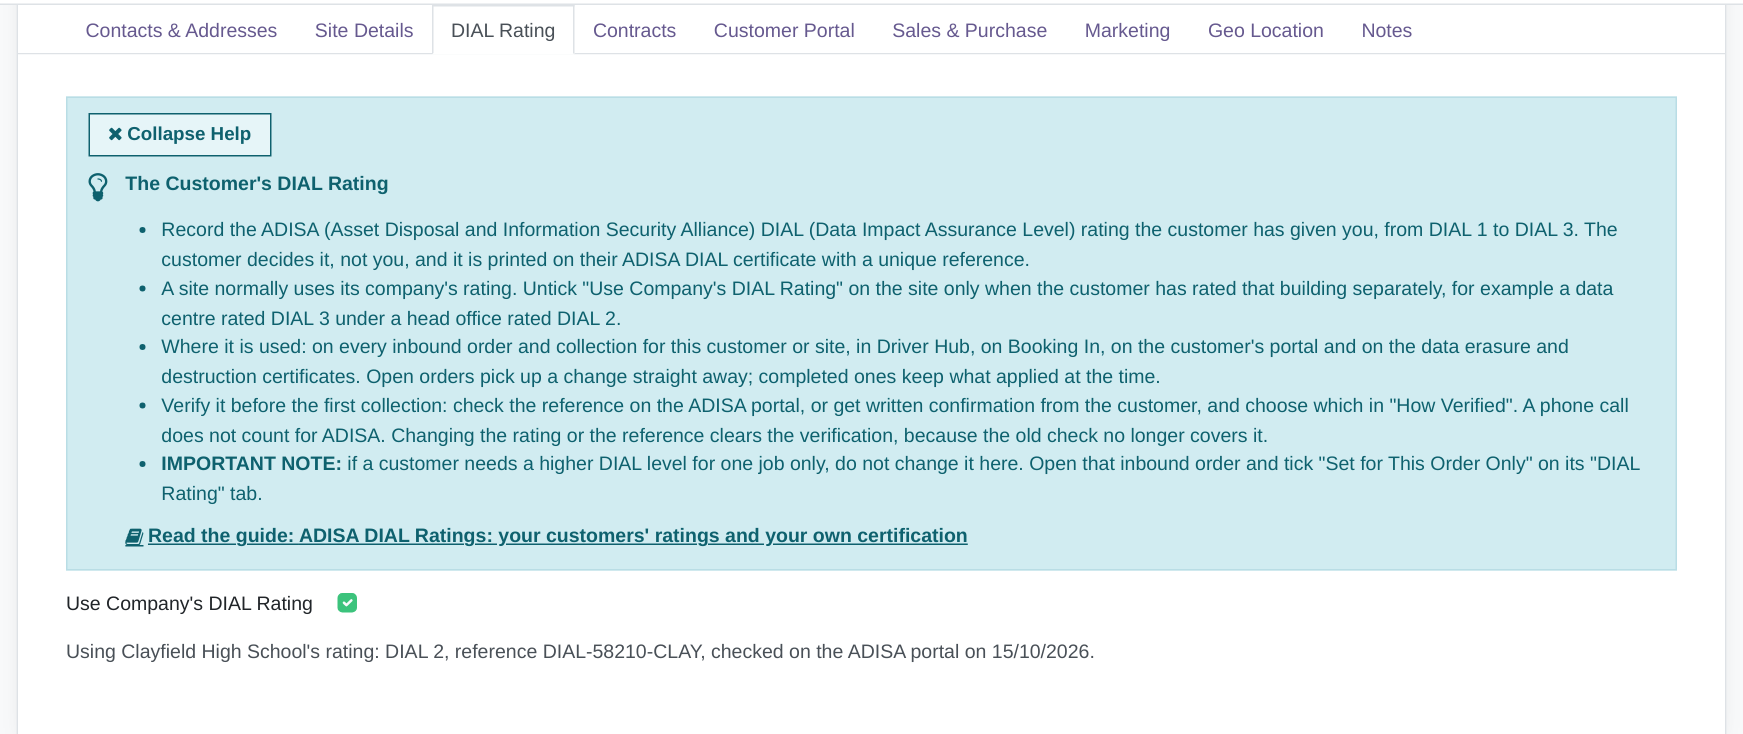
A site using its company's rating.
Untick it only when the customer has rated that site separately. The same two groups as on a company then appear, for the site alone. Unticking keeps whatever the site's own boxes already held, and ticking again does not erase them; it just stops using them.
Wherever RecyclyERP needs a site's rating, it uses the DIAL rating in use: the site's own while the box is unticked, otherwise its company's. So changing the company's rating changes it on every site using it, straight away, with nothing to save on the sites, and moving a site to a different company switches it to the new company's rating.
7. A different rating for one job only
If a customer needs one job handled at a different level, for example a single DIAL 3 collection from a customer who is normally DIAL 2, do not change their Address Book record. Open the inbound order and use its own DIAL Rating tab, after "Packaging & Warehousing".
The tab opens with a tick box, Set for This Order Only. While it is unticked, every box on the tab is read-only and a grey line says where the rating really comes from, for example "Taken from IT Department, which uses Clayfield High School's rating. To change it, edit Clayfield High School's DIAL Rating tab, or tick Set for This Order Only.", with that record beside it as a link. Where that record holds a certificate, the tab shows "View the certificate on Clayfield High School" instead of a file box.
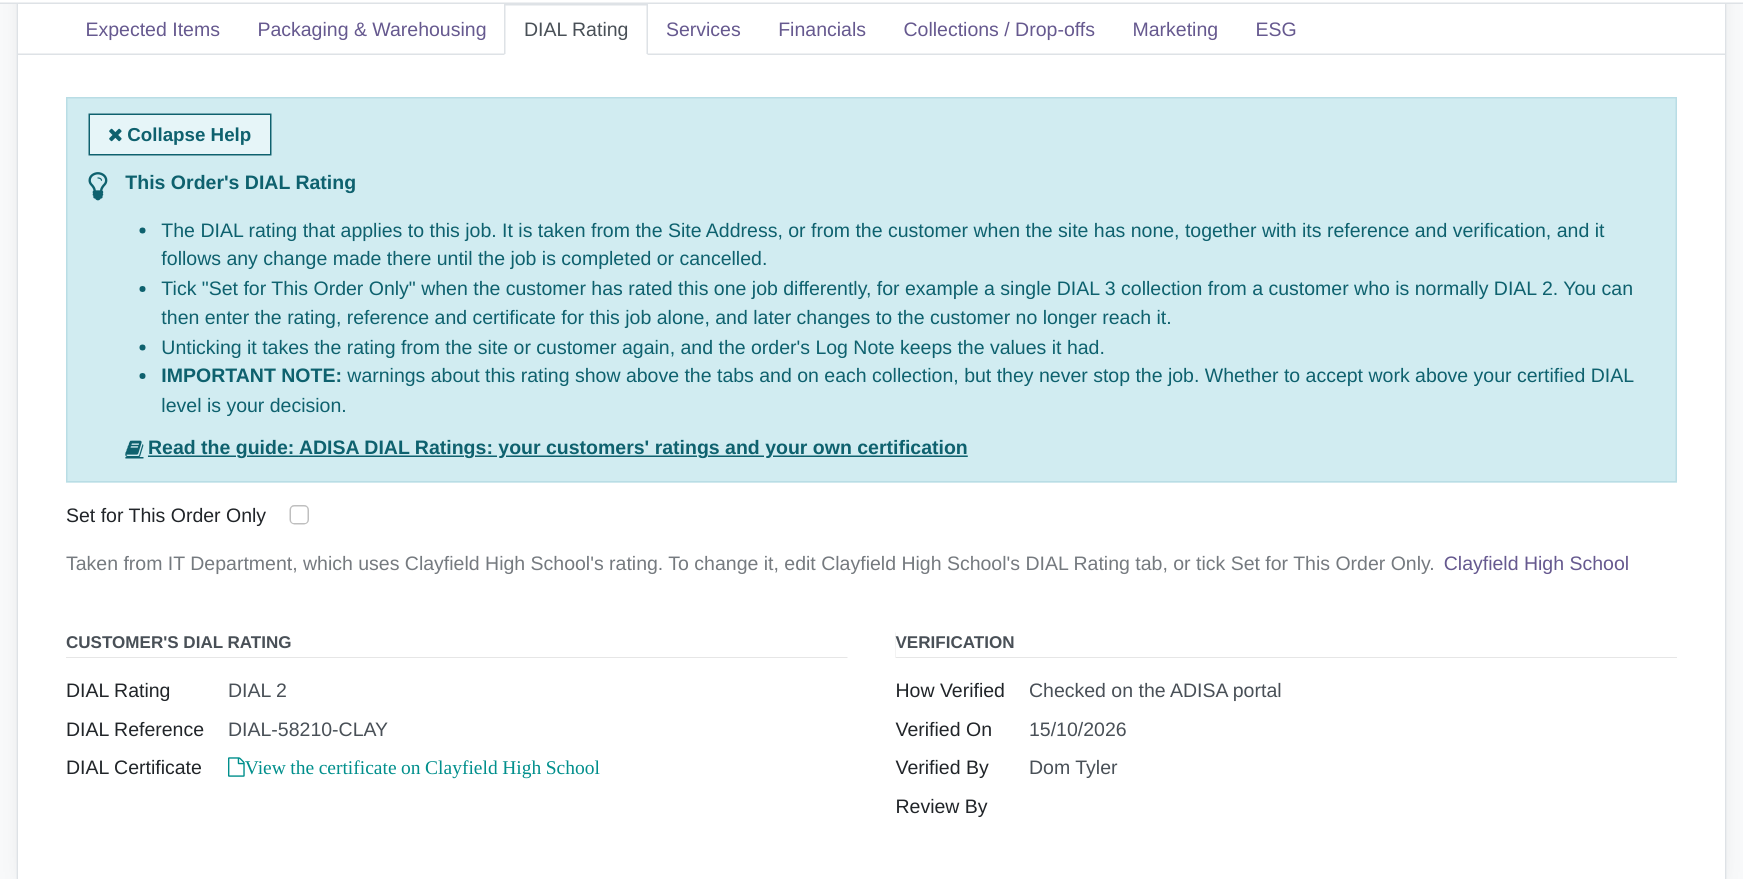
An inbound order's DIAL Rating tab, taking its rating from the site.
- Tick Set for This Order Only and the boxes become editable, starting from the values already there. Enter the rating, reference, certificate and verification for this job alone. They follow the same verification rules as a company (section 5), and later changes to the customer no longer reach this order.
- Untick it and the order takes its rating from the site or customer again. The Log Note keeps the values the order had, for example "Set for This Order Only switched off. The DIAL rating this order had: DIAL 3, reference DIAL-77001-JOB, ...", and a certificate uploaded for this order is attached to that Log Note line rather than deleted.
A customer who is a person with no company has no DIAL rating, and the tab says so: "This customer is a person with no company, so no DIAL rating applies. To give this job one, tick Set for This Order Only."
8. What staff see on inbound orders and collections
Where an order's rating comes from. An inbound order takes its rating from its Site Address when that is a company or site with a rating in use, otherwise from the customer's company. A drop-off ignores its Site Address and uses the customer's company. The rating is copied onto the order with its reference and verification when the order is created, and again whenever "Customer" or "Site Address" changes, so orders created from the booking form, by importing or by any other route get it too. Duplicating an order takes the rating afresh; "Set for This Order Only" is not copied.
On the inbound order (Inbound > Inbound Orders > Inbound Orders):
- DIAL Rating shows directly below "Contract", for example "DIAL 2", followed in grey by where it came from: "from IT Department", "from Clayfield High School" or "set for this order only". It reads "Not recorded" when there is none.
- A blue box above the tabs shows the level's handling instructions, for example "DIAL 3: Label every item and scan it at the customer's site, then scan it again when it arrives at the warehouse." Nothing shows when that level's Handling Instructions are blank.
- A yellow box directly below it lists every DIAL warning that applies, one per line (section 9).
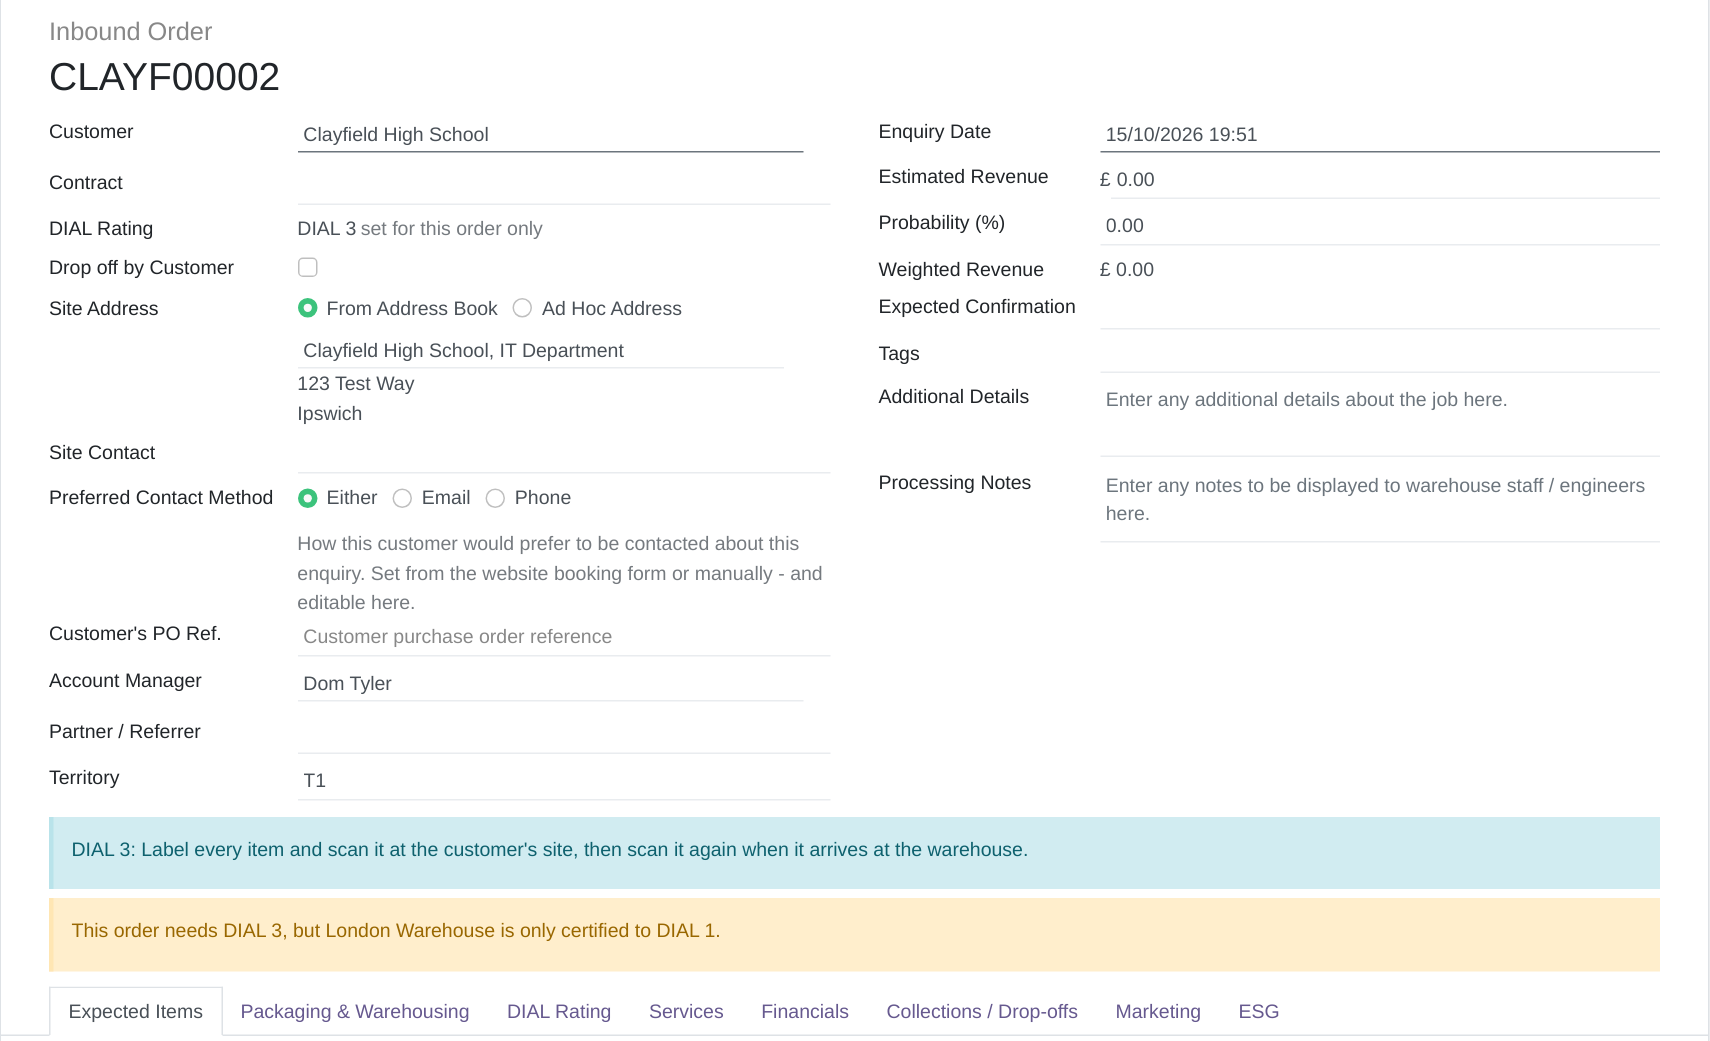
An inbound order: the rating below Contract, then the instructions and warnings above the tabs.
On a collection or drop-off (Inbound > Collections & Drop-offs > Collections & Drop-offs):
- DIAL Rating shows directly below "Inbound Order". It is taken from the inbound order and follows the order's changes while the collection is open. Once the collection is completed it stops changing, so a finished collection keeps the rating that applied on the day.
- The same blue and yellow boxes show directly under the help panel at the top, saying "this collection" rather than "this order", and checking the collection's own destination warehouse.
- None of this shows on deliveries, internal transfers or returns.
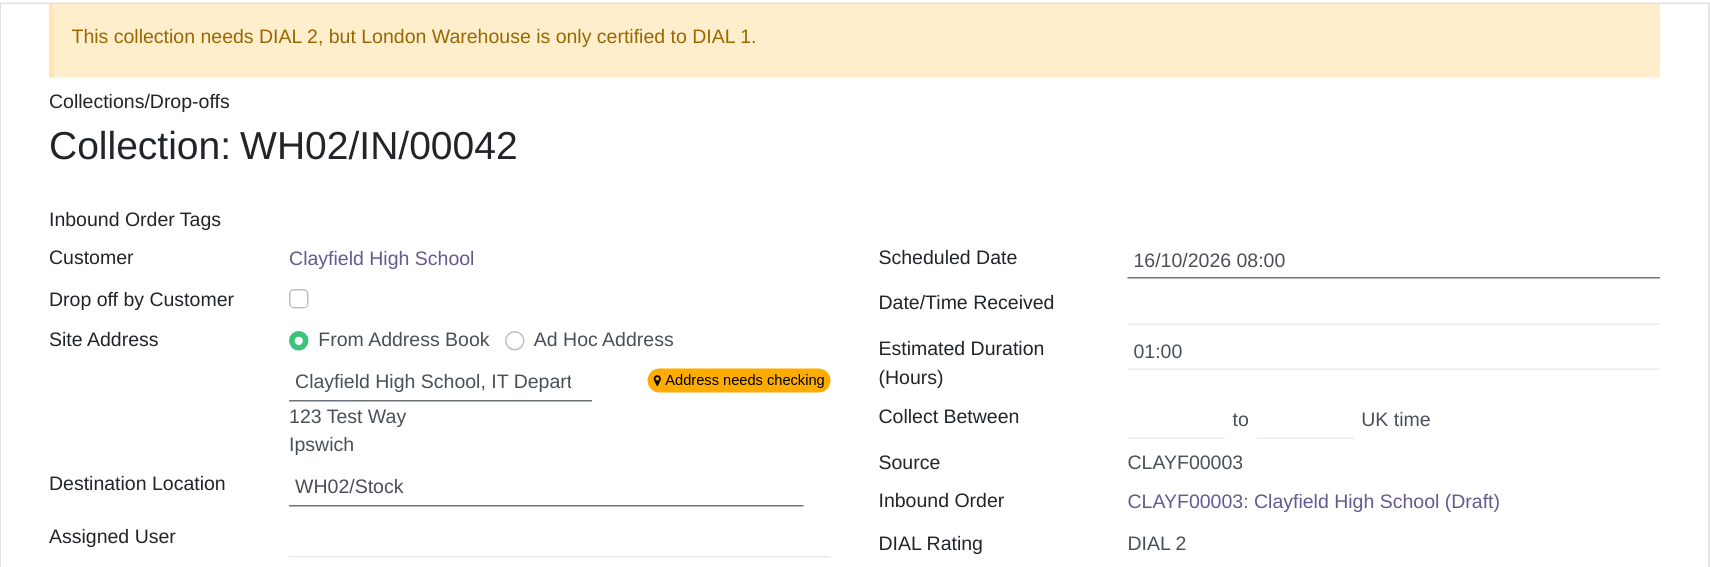
A collection going to a warehouse certified to a lower level.
9. The DIAL warnings
Each warning shows in the yellow box on inbound orders and collections only while its tick box under Settings > Inbound > ADISA DIAL Ratings > "DIAL Warnings" is ticked. Warnings never stop anything: saving, moving a stage, scheduling collections and invoicing all work exactly as before. Whether to accept work above your certified level is your decision.
- No DIAL rating recorded (unticked to start with): "No DIAL rating is recorded for this customer or site. Ask the customer for their ADISA DIAL certificate, then record it on their Address Book record." Switch it on once your customers' ratings are recorded.
- DIAL rating not verified: "The DIAL rating has not been verified. Check the DIAL Reference on the ADISA portal, or get written confirmation from the customer, then fill in How Verified."
- Review By date has passed, from the day after the date: "The customer's DIAL Review By date (30/09/2026) has passed. Check the rating is still current."
- Above our certified DIAL level, in one of these forms: "This order needs DIAL 3, but London Warehouse is only certified to DIAL 1.", "This order needs DIAL 2, but no ADISA certified DIAL level is recorded for London Warehouse.", or, from the day after your certificate's expiry date, "Our ADISA certificate AAC030 for Main Warehouse expired on 31/08/2026." (without the number when none is recorded).
- Contract designed for a lower DIAL: "Contract" followed by the contract's reference, then "is designed for DIAL 1, but this order needs DIAL 2."
"No DIAL rating recorded" shows only while the order has no rating; the other four only while it has one. An order whose customer is a person with no company shows no DIAL warnings at all.
Which warehouse is checked. On an inbound order: the "Destination Warehouse" on its "Packaging & Warehousing" tab when one is set; otherwise each warehouse its collections are going to, one line per warehouse that falls short; otherwise your company itself. On a collection: the collection's own destination warehouse. The level checked is the warehouse's level in use, its own or your company's (section 3). DIAL 3 is above DIAL 2, which is above DIAL 1.
Designed for DIAL on contracts. Contract Templates (Inbound > Configuration > Contracts > Contract Templates) and Contracts (Inbound > Inbound Orders > Contracts) have a Designed for DIAL box directly below "SLA Days" (Service Level Agreement days): the DIAL level the contract's services are designed for. Leave it blank if the contract is not tied to a level. Creating a contract from a template copies it across, and "Update selected Contract(s) from Contract Template" has a "Designed for DIAL" tick box to update existing contracts. Templates and contracts whose name contained "DIAL 1", "DIAL 2" or "DIAL 3" when the feature arrived had it filled in from the name, with a Log Note line saying so.
10. Lists, filters and group-bys
- Address Book > Companies & Contacts: a DIAL Rating column, added from the column chooser (the small icon at the far right of the column headings), shows the rating in use, so a site shows its company's rating unless it has its own. The filters DIAL 1, DIAL 2, DIAL 3, No DIAL Rating and DIAL Not Verified sit in their own block after "Staff", and you can group by DIAL Rating. "DIAL Not Verified" finds customers with a rating whose How Verified is blank. A company's "Sites" tab has the same column, after "City".
- Inbound > Inbound Orders > Inbound Orders: a DIAL Rating column after "Site Address", shown to start with; the filters DIAL 1, DIAL 2, DIAL 3 and No DIAL Rating after "Asset Purchases"; and a DIAL Rating group-by. Each card shows a small badge after the order number: DIAL 3 red, DIAL 2 amber, DIAL 1 grey.
- Inbound > Collections & Drop-offs > Collections & Drop-offs: a DIAL Rating column after "Inbound Order", the same four filters just above "Needs Rebooking", a DIAL Rating group-by, and the same badge after the reference on each card. The Route Planning board shows the badge on each collection card, beside where "Hazardous" appears.
- Contracts and Contract Templates: a Designed for DIAL column, added from the column chooser, and a Designed for DIAL group-by.
- Warehouses: the ADISA DIAL Level column (section 3).
Badges show only for levels with "Show Badge on Cards" ticked. The DIAL Rating and ADISA DIAL Level columns cannot be typed into in a list, because they come from the customer, site, order or company; change them where they are recorded.
11. Driver Hub
For a collection whose level has "Show in Driver Hub" ticked:
- On the driver's list, the card shows a small pill such as DIAL 3 beside the status pill ("Next", "New" or "Collected"), DIAL 3 red, DIAL 2 amber, DIAL 1 grey, while that level's "Show Badge on Cards" is ticked too.
- When the driver opens the collection, a block after the collection's notes shows the level and its handling instructions, or just the level when the instructions are blank.
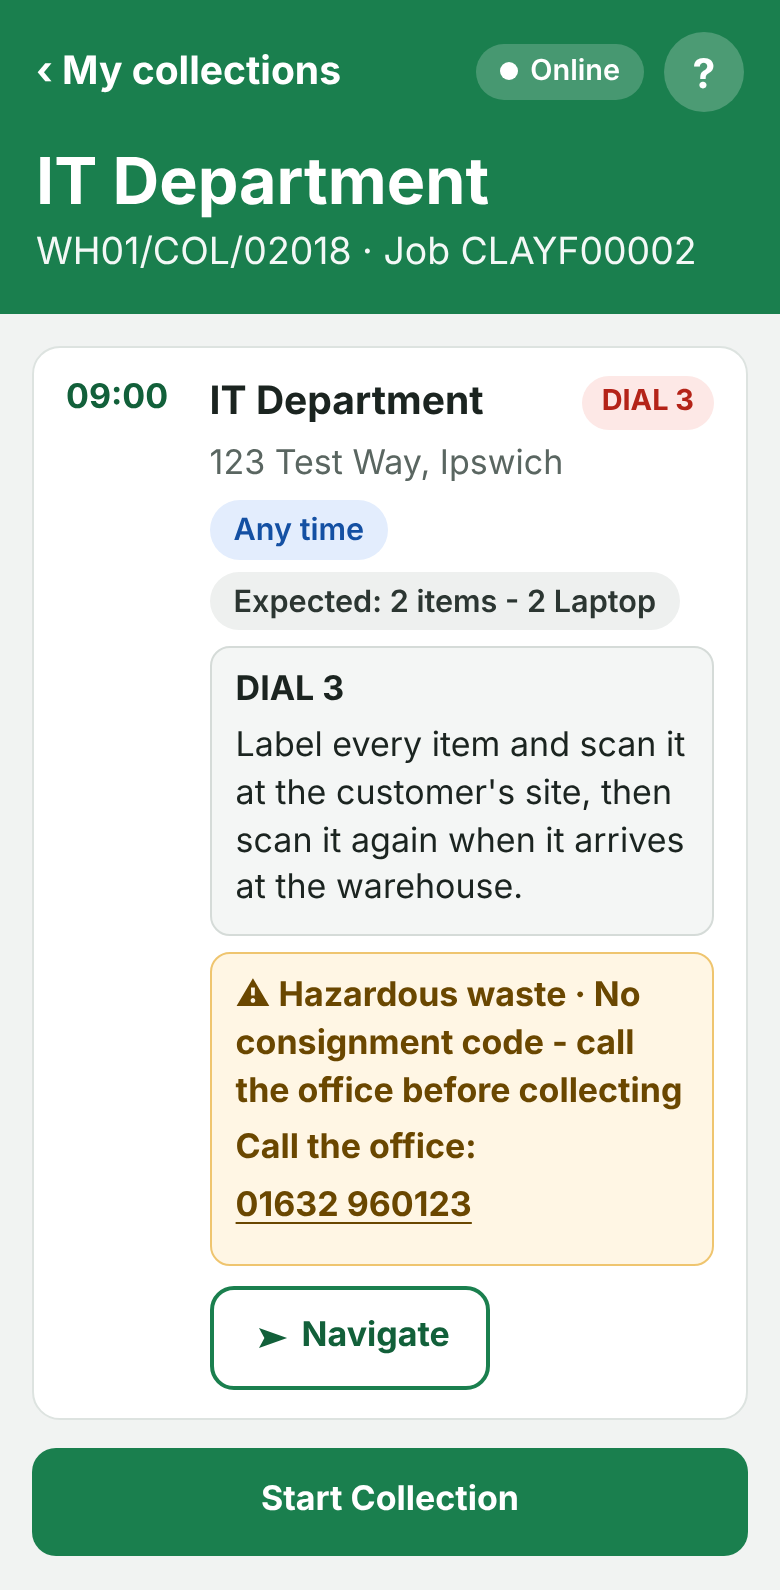
Driver Hub: an opened DIAL 3 collection.
The level's two scanning settings work alongside your Driver Hub settings at Users & Settings > Settings > Inbound > Driver Hub:
- Scanning in Driver Hub = Required: on a job that lists individual items (Items Entry Method "Enter or import a list of individual expected items"), the Scan step has no Skip scanning button, whatever "Scanning items in Driver Hub" says. The driver scans each item, or marks it "Not here" and says why.
- Scan Button on Summary Jobs = Always show it: on a summary job, each item line has its Scan barcodes / QR codes button even where "Drivers can scan items on summary jobs" is unticked.
IMPORTANT NOTE: "Required" scanning cannot force every item to be scanned on a summary job. A summary job, for example "Laptop 20", has no list of individual items for Driver Hub to check against, so there is nothing for "Required" to hold the driver to. The driver sees the handling instructions and the scan button, scanning stays optional, and the warehouse scans each item when it arrives (section 12). If a customer needs every item scanned at their site, enter their job as a list of individual expected items.
Both scanning settings still apply when "Show in Driver Hub" is unticked, so a driver can find Skip scanning missing on a DIAL 3 job without seeing why. Leave "Show in Driver Hub" ticked on any level set to Required.
A phone still running an older copy of the app may still offer Skip scanning. If the driver uses it on a collection whose level requires scanning, the proof of collection is accepted as normal, and the collection's Log Note says, for example, "Scanning was skipped in Driver Hub although DIAL 3 requires it."
12. Booking In
When the goods from a collection arrive at the warehouse, the Booking In screens show the collection's DIAL level and handling instructions in a blue box, for example "DIAL 3: Label every item and scan it at the customer's site, then scan it again when it arrives at the warehouse.", or just "DIAL 3" when the instructions are blank:
- On the touchscreen Booking In screen, directly below the header row (Collection, customer, warehouse).
- On the Standard screen, "Scan Incoming Items & Lots", directly below the green title.
- In the pop-up "Scan Incoming Expected Items", at the top, above "From the driver".
Which screen opens from Book In Items & Lots depends on each user's "Booking In Screen Type". The box is information, not a warning, and nothing shows for a collection with no DIAL rating.
13. The Customer Portal and the booking form
A signed-in customer sees the level only, never the DIAL Reference, the verification, the Review By date or the certificate, and nothing about any other customer. They cannot change it.
- Site Access Details: directly below the "Site:" picker, a line for the organisation or site chosen: "DIAL Rating: DIAL 2", "DIAL Rating: DIAL 2 (your organisation's rating)" for a site using its organisation's rating, or "DIAL Rating: Not recorded". A portal user with no organisation sees no DIAL line.
- The booking form (/book-a-collection-or-drop-off): once a signed-in customer chooses a site, the top of the "Access At Your Site" section reads, for example, "DIAL Rating for this collection: DIAL 2". Visitors who are not signed in see nothing, and nor does a customer with no rating recorded.
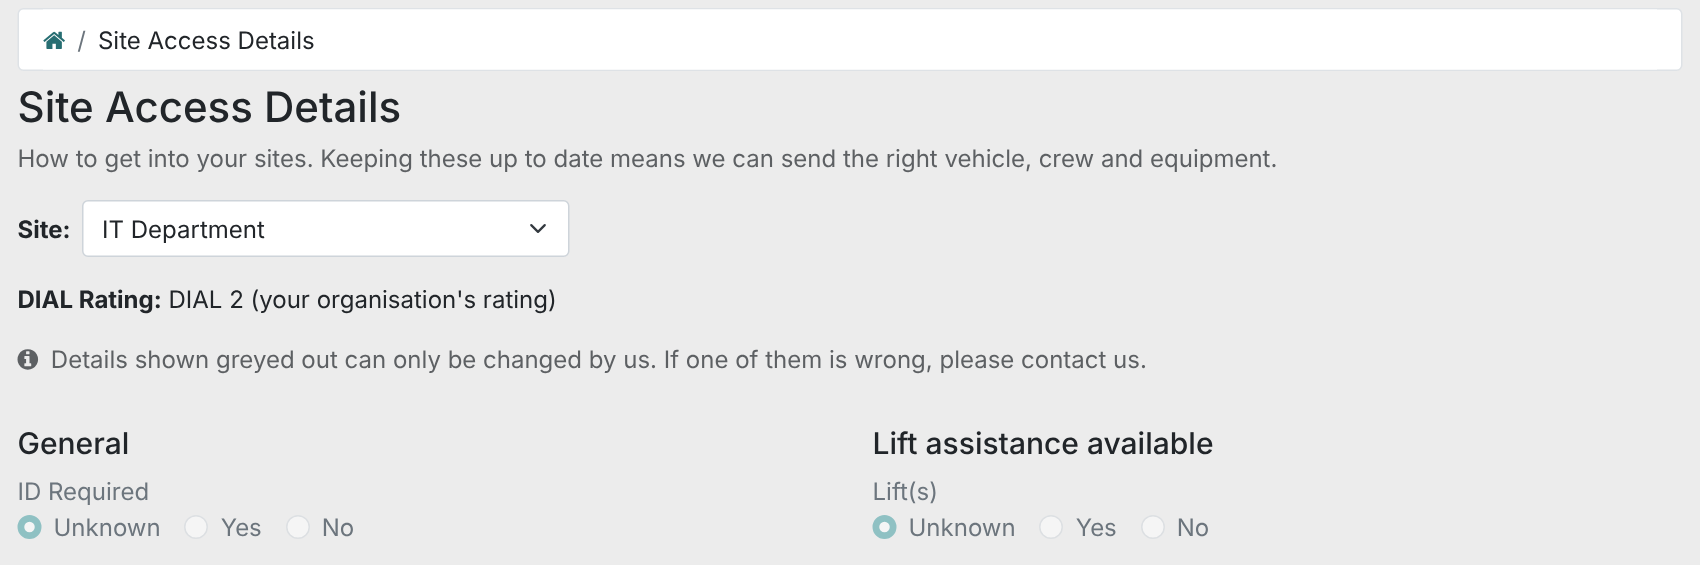
The Customer Portal: the customer sees their level and nothing else.
Both depend on Site Access Fields: the Site Access Details page, and the "Access At Your Site" section of the booking form, appear only when at least one Site Access Field is shown on the booking form. An order the customer books takes its DIAL rating by the normal rule in section 8, so nothing on the form sets or changes it. To see these lines as a customer sees them, simulate one of their portal users.
14. Documents and certificates
The shipped certificates. The "Data Erasure Certificate", "Data Destruction Certificate" and "Inventory Report" supplied with RecyclyERP (Templates & Documents > Document Templates) carry a line directly under "Inbound Order Date:" in their header box, in the same style:
- "DIAL Rating: DIAL 3 (ADISA reference DIAL-58210-CLAY)", or "DIAL Rating: DIAL 3" when the order has no reference.
- Nothing at all when the order has no DIAL rating, or while ADISA DIAL Ratings is switched off, so no empty "DIAL Rating:" label is left behind. At most one blank line remains at the bottom of that box.

The DIAL line on a Data Erasure Certificate.
Where your copy of one of these three templates was still exactly as RecyclyERP supplied it, it was updated for you, and the file it had before is kept on the template's Versions tab, labelled "Recycly template before DIAL Rating (T20282)". A template you had edited yourself was left exactly as it was.
Adding the line to a template you have edited.
- Open the template at Templates & Documents > Document Templates and download its current file from "Template File".
- In Word, put the cursor on a new line under "Inbound Order Date:" and use Insert > Quick Parts > Field..., choose "Mail Merge" and "Merge Field", and type record.dial_document_line as the field name. It is listed as "DIAL Rating Line (blank when none)" under Commonly Used Fields on the template's Merge Fields tab.
- Save the file and upload it to the template as a new version, as "Creating and Editing Document & Report Templates" describes.
Merge fields. While ADISA DIAL Ratings is switched on, Commonly Used Fields lists these, after the other rows:
- Inbound Orders: "DIAL Rating", "DIAL Reference", "DIAL Rating Line (blank when none)", "DIAL Rating Verified On", "Our ADISA Certified DIAL Level" and "Our ADISA Certificate Number". The last two give the order's Destination Warehouse's certification, or your company's when no warehouse is set.
- Collections / Drop-offs: "DIAL Rating" and "DIAL Handling Instructions".
- Contacts: "DIAL Rating" and "DIAL Reference", for the rating in use.
- Items & Lots: "DIAL Rating", from the item's inbound order. The certificates printed for single items are unchanged, but can carry it.
- Contracts: "Designed for DIAL".
Every other DIAL box can be reached through the Merge Field Generator in the usual way.
15. When a rating changes: open and completed jobs
- Open inbound orders follow the change. When the rating, reference, verification or Review By date changes on a company or site, every inbound order taking its rating from that record, directly or through a site using its company's rating, is updated straight away, unless it is completed, cancelled or "Set for This Order Only". Each order updated gets one Log Note line, for example "DIAL rating updated from Clayfield High School: DIAL 2 > DIAL 3.", or, when only the reference or verification moved, "DIAL rating details updated from Clayfield High School: still DIAL 2, reference or verification changed."
- A site switching "Use Company's DIAL Rating" on or off, a site moved to another company, and two companies merged into one all count as a change for their open orders.
- Completed and cancelled inbound orders never change: they keep the rating that applied while the work was done. Nor do orders set for this order only.
- Open collections follow their order. Completed collections are frozen, so a finished collection keeps the rating that applied on the day, even if the order or the customer changes later.
- Orders that existed before the feature arrived start with no rating, and pick one up only when their customer or site is given one.
- Switching ADISA DIAL Ratings off changes no job: every value is kept, ready for when it is switched back on.
16. Related guides
- The Address Book: Companies, Sites and Contacts (opens in a new tab) - setting up the customers and sites that hold a DIAL rating.
- Doing a collection, including no signal (opens in a new tab) - the driver's side of a collection in Driver Hub, including scanning each item.
- Creating and Editing Document & Report Templates (opens in a new tab) - downloading, editing and uploading a template, for adding the DIAL line yourself.
- Customer Portal for staff: what you see, and how to simulate a customer (opens in a new tab) - seeing the portal exactly as a customer does.