RecyclyERP runs the whole of an ITAD (IT Asset Disposition) business in one place: the enquiry, the collection, the audit, the warehouse, the resale, the invoice, and the reporting your customers ask you for.
This guide is the short version. Read it once, in about ten minutes, and you will know what the system does, where each part lives, and what to open next.
1. What this guide covers
Ten steps follow the path a single job takes, from the first enquiry to the invoice, and the sections after them cover what you use on every screen. This is a map, not a manual: each section is a few sentences and ends with Read more links to the fuller guide, where one exists.
2. Start with the Setup Assistant (if you have it)
On a new system, open the Setup Assistant from the main menu. It lists every setup action your system needs, grouped into areas running from your company details through to your website and portal, and each action carries its own status so you can see what is left.
It appears only for users in the Feature: Setup Assistant Enabled group, so ask your administrator if you cannot see it. While actions are outstanding, a reminder sits above the main menu.

The Setup Assistant, grouped by area.

The reminder above the main menu.
3. Watch the videos first
Three short video playlists cover the system, listed as Overview, Setup and Config and Workflows. They sit in two places: the Getting Started area of the Setup Assistant, and the menu under your own name in the top right of every screen.
Twenty minutes of video will save you an hour of clicking about.

The menu under your name.
4. The shape of an ITAD job
Almost everything follows one path. An enquiry becomes an Inbound Order, which schedules a Collection or Drop-off, which books in Items & Lots, which are audited and graded, warehoused, sold on an Outbound Order, delivered and invoiced. Returns and reporting hang off the side.
You rarely have to go looking for the next step: every record carries buttons through to the one that follows it.

How a job moves through the system.
5. Step 1, the enquiry
Enquiries arrive as Leads, under Inbound > Leads, either typed in by your team or straight off the booking form on your own website. A lead holds the enquiry until you know it is real, and converting it creates the customer, the site and the job in one go.
Leads can be switched off for a system, in which case enquiries go straight to an Inbound Order instead.

The Leads list, where enquiries land.
6. Step 2, the job
The Inbound Order, under Inbound > Inbound Orders > Inbound Orders, is the record you will spend your day on: the customer, the site, the items you expect, the services, the money, and every collection raised against it.
It moves through your own stages, set up under Inbound > Configuration > Leads & Inbound Orders > Inbound Order Stages, so the board reads the way your business works. The buttons along the top take you everywhere else, and the smart buttons count what the job has produced.

An Inbound Order, the record you live on.
7. Step 3, quoting and buying
Quotations, purchase orders and settlements live under Inbound > Sales & Purchases, but you will usually raise them from the Financials tab of the job itself, with New Quotation, New Asset Purchase Order or New Draft Settlement.
Raising them there keeps the paperwork joined to the job, so nothing has to be matched up by hand later.

The Financials tab of a job.
Read more: Buying in stock to resell (opens in a new tab), Editing the terms and conditions customers see (opens in a new tab).
8. Step 4, the collection
Schedule Collection and Schedule Drop-off on the job put the movement in the diary, and everything scheduled shows under Inbound > Collections & Drop-offs. The calendar view is the one most teams live in, alongside a dashboard of what is still awaiting stock.
Each record carries the site details and access notes your driver needs, and the vehicle and crew going out.

The collections calendar for a busy week.

A collection, with its site details and crew.
Read more: The collections calendar (opens in a new tab), Collections where the items are not known in advance (opens in a new tab), Setting up drivers and crew (opens in a new tab), Default stock locations (opens in a new tab).
9. Step 5, booking the items in
When the van comes back, open the Collection or Drop-off and press Book In Items & Lots. You record what actually arrived, item by item or as a lot, printing labels as you go with Print New ID Labels; stop part way and the button reads Resume Booking In Items & Lots.
Stock bought in on a purchase order books in the same way, though there the buttons read Book Items In and then Finish Booking In.

A collection ready to process.

Booking items in, part way through.
10. Step 6, auditing and grading
Everything you have booked in appears under Inbound > Collections & Drop-offs > Items & Lots. Audit and erasure reports from Blancco, Aiken, Certus Erasure and YouWipe attach themselves to the right item as they import, and are listed under Inbound > Reporting > Hardware Audit Reports.
The Grading block shows the score, the Calculated Item Grade your rules produced, and the Final Item Grade you will stand behind. Recalculate re-runs the rules, Revert to Calculated undoes an override, and the rules live under Inbound > Configuration > Asset Valuation & Grading.

The Grading block on an item.

Audit reports from more than one source.
Read more: Importing hardware audit reports (opens in a new tab), Traceability on asset types (opens in a new tab), Parts harvesting and demanufacturing (opens in a new tab), Marking items as recycled (opens in a new tab), Acting on a large number of assets (opens in a new tab).
11. Step 7, the warehouse
Logistics & Inventory is the warehouse side of the same items: Items & Lots again, the Operations that move stock about, Reporting, and the Configuration that decides where things land by default.
UK sites operating under an environmental permit also get the Digital Waste Tracking (DWT) export, under Operations. You pick a day, check the loads it found, press Generate Defra Spreadsheet to produce the file you upload to Defra, then Mark Day as Submitted to Defra; a daily reminder chases you until you have.

The Logistics & Inventory menu.
Read more: Digital Waste Tracking (opens in a new tab), Default stock locations (opens in a new tab).
12. Step 8, selling it
The Outbound menu mirrors the inbound side: Leads and Opportunities for sales you are chasing, Quotes & Sales Orders for the ones you have won, and Items & Deliveries for getting goods out of the door. Your own online store publishes stock straight from those same items.
Returns sit on the same menu and run from Authorised through to Resolved, so a Return Merchandise Authorisation (RMA) never becomes a spreadsheet.

Items waiting to be delivered.

A return, authorised and awaiting receipt.
Read more: Creating an outbound order (opens in a new tab), Part-shipping orders (opens in a new tab), Invoicing policy (opens in a new tab), Selling in multiple currencies (opens in a new tab), Publishing items to your online store (opens in a new tab), Raising a return (opens in a new tab), Receiving items back (opens in a new tab), Credit notes, refunds and replacements (opens in a new tab), The customer pack and return labels (opens in a new tab), The Returns report (opens in a new tab).
13. Step 9, getting paid
Invoicing covers your customer invoices, credit notes and the tax rules behind them, and posts straight into Xero or QuickBooks so that nobody re-keys anything.
What you invoice for can follow the quantities you expected or the quantities you actually processed, which matters on the many jobs where the two are never quite the same.

The Invoicing menu.
Read more: Tax schemes (opens in a new tab), Updating tax rates (opens in a new tab), Invoicing on actual quantities (opens in a new tab), Xero (opens in a new tab), QuickBooks (opens in a new tab), QuickBooks invoice numbers (opens in a new tab), QuickBooks access (opens in a new tab), Creating QuickBooks accounts (opens in a new tab).
14. Step 10, what you can show the customer
Your customers get their own portal: their jobs, their collections, their documents and their invoices, without ringing you for any of it. Where ESG (Environmental, Social and Governance) reporting is switched on, they also see the weight you processed, what happened to it, and the carbon dioxide equivalent avoided.
The Customer Preview button on a job shows you exactly what they will see, before you invite anybody.

Customer Preview, on a job.
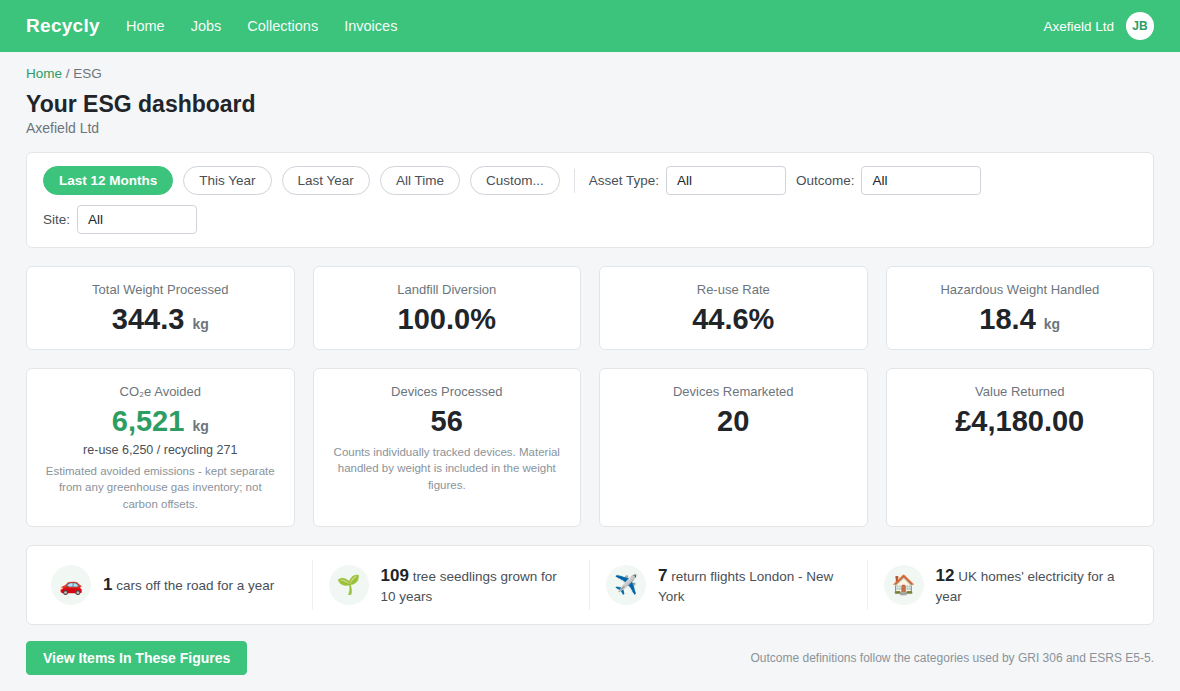
What a customer sees on their ESG page.
Read more: Inviting customers to the portal (opens in a new tab), Terms and conditions on portal quotations (opens in a new tab), How CO₂e avoided is counted (opens in a new tab), The customer portal ESG dashboard (opens in a new tab), The ESG Summary and Environmental Impact Report (opens in a new tab).
15. Finding things fast
Four habits save more time than anything else here.
- Search the menus. Click Search menus... at the top of the main menu and type. It matches the whole path, so "grading" finds the grading configuration wherever it lives. It searches menus, not records.
- Narrow a list. Every list has a search box with three drop-downs beneath it: ready-made filters, a group-by, and the one that saves the view you have built so you can come straight back to it.
- Change the view. The switcher at the top right offers the other ways of seeing the same records: list, board, calendar and charts.
- Open the help. Screens with an Expand Help button carry a panel explaining what the screen is for. It stays as you left it, for you, on that screen.

Searching the menus.

A list with its search drop-downs open.

The help panel, expanded and collapsed.
Read more: Basic and advanced exports (opens in a new tab).
16. Your own settings, and everyone else's
My Profile, under your name, holds your own preferences: language, time zone, and how you want to be notified.
Users & Settings > Settings is the administrator's, where features are switched on and off for the whole system, and Users & Settings > Users is where people are added and given their permissions.

My Profile, on the Preferences tab.
Read more: Default permissions for new users (opens in a new tab), What an administrator user is (opens in a new tab), Reference numbers and prefixes (opens in a new tab).
17. Your own knowledgebase, inside the system
The Knowledgebase app is yours rather than ours: it is where you write your own working instructions, for your own staff, in your own words.
Articles can be kept internal, or shown to your customers on the portal.

Your own Knowledgebase, inside the system.
18. Where to go next
The full set of guides is at User & Setup Guides on recyclyerp.com, and under your name inside the system.
If you are setting the system up rather than learning your way around it, start with Data Import to get your existing records in, and Document Templates to make the paperwork your own.
Read more: Importing items and lots (opens in a new tab), Importing individual hard drives (opens in a new tab), Data import questions (opens in a new tab), Document and report templates (opens in a new tab).