Recycly User & Setup Guides
< Back to Article ListReturns (RMAs): the customer pack, the RMA document and return labels
Last updated: 4 September 2026 at 08:36:19 UTC by Dom Tyler
Once a return has been agreed, RecyclyERP gives the customer everything they need: the RMA (Return Merchandise Authorisation) document that goes inside the parcel, the email that carries it, and a prepaid label for the box. Together those are the customer pack.
The rest of the process is covered in Returns (RMAs): setting up and raising a return, Returns (RMAs): receiving items back and deciding what happens to them and Returns (RMAs): credit notes, refunds and replacement orders.
1. What the pack is, and when it unlocks
A return in Draft has nothing to send. Pressing Authorise stamps Authorised On, applies the Deadline and unlocks the pack: Email RMA to Customer, Documents > RMA Document and, where a carrier account is connected, Get Return Label. They stay available through Awaiting Receipt, Received and Resolved, so a customer who has mislaid theirs can be sent another.
The pack is never available on a Cancelled return: RecyclyERP refuses, naming the status the return is actually at. Nor will it produce paperwork for a return whose items have all been removed - put them back first.
2. Emailing the pack
Email RMA to Customer opens the standard email window, titled Send Return Authorisation, already addressed and already carrying the attachments, and nothing leaves until you press send. A return's Customer is always a company, so the email goes to a real person underneath that company, provided they have an email address on their record; where nobody does, it falls back to the company itself. If returns keep reaching a generic address, add an email address to the contact. Attached are the RMA document and the return label if there is one, and the document is produced fresh each time, so a return edited this morning emails today's paperwork. Each copy is filed against the return, so one sent twice carries two.
Once the message goes the button changes: until then it reads Email RMA to Customer, afterwards Re-send RMA to Customer, so nobody sends a second copy to find out whether the first went. Discard the window without sending and nothing changes. Buying a label afterwards emails nobody on its own: press Re-send RMA to Customer and the second email carries document and label together.
An administrator can switch Auto-send RMA email on authorise on under Users & Settings > Settings > Sales > Returns. Authorise then asks you to confirm first, because one press both authorises the return and sends an email that cannot be recalled. It is queued rather than sent: the message joins the outgoing mail queue and leaves on its next run, not the instant you press the button.
3. What the customer receives
The email comes from the template RMA - Return authorisation, subject line Return authorisation followed by the reference and your company name. It greets a named contact by first name, or the customer company by its own name where there is no contact to write to. It gives three instructions - put the RMA document inside the parcel, write the reference on the box, and send only the items listed - and a fourth, asking for them by the Deadline, only where the return has one. Your own wording goes in its place at Users & Settings > Settings > Sales > Returns > RMA Email Template.
The document is headed RETURN AUTHORISATION, with the reference beneath it and a barcode of that reference for scanning at goods-in. Your company logo and address sit to the left of that heading. Below them are a Customer block carrying their address and a Details panel carrying the Type of return with Authorised: and Return by: lines, then a table with the columns Item/Lot ID, Product, Serial Number, Source Order, Quantity and Reason. Underneath are Return Instructions - standing text set once under Users & Settings > Settings > Sales > Returns > Return Instructions and printed on every RMA document - and Comments, the note on this return. If either is empty its heading disappears too.
You can check what a line will print without producing the document: open it from Items and its On the RMA Document tab shows, under Exactly As It Prints, five of those six columns as they will appear - everything but Quantity, which comes straight off the line and always prints a figure. A dash is what prints where there is nothing to show, because a printed document cannot fall back to anything.
4. Printing the document
Open the return and choose Documents > RMA Document. You get a PDF (Portable Document Format) file named after the template and the return, so RMA00042 downloads as "RMA Document - RMA00042.pdf" - the same file the email attaches, so the customer's copy and the warehouse's are identical. The Documents menu is hidden altogether on a Draft or cancelled return.
5. Buying a prepaid return label
With a carrier account connected, Get Return Label buys the customer a prepaid label, so they neither arrange nor pay for the postage. This spends real money. It is bought on your live carrier account and charged there and then, so check the screen first.
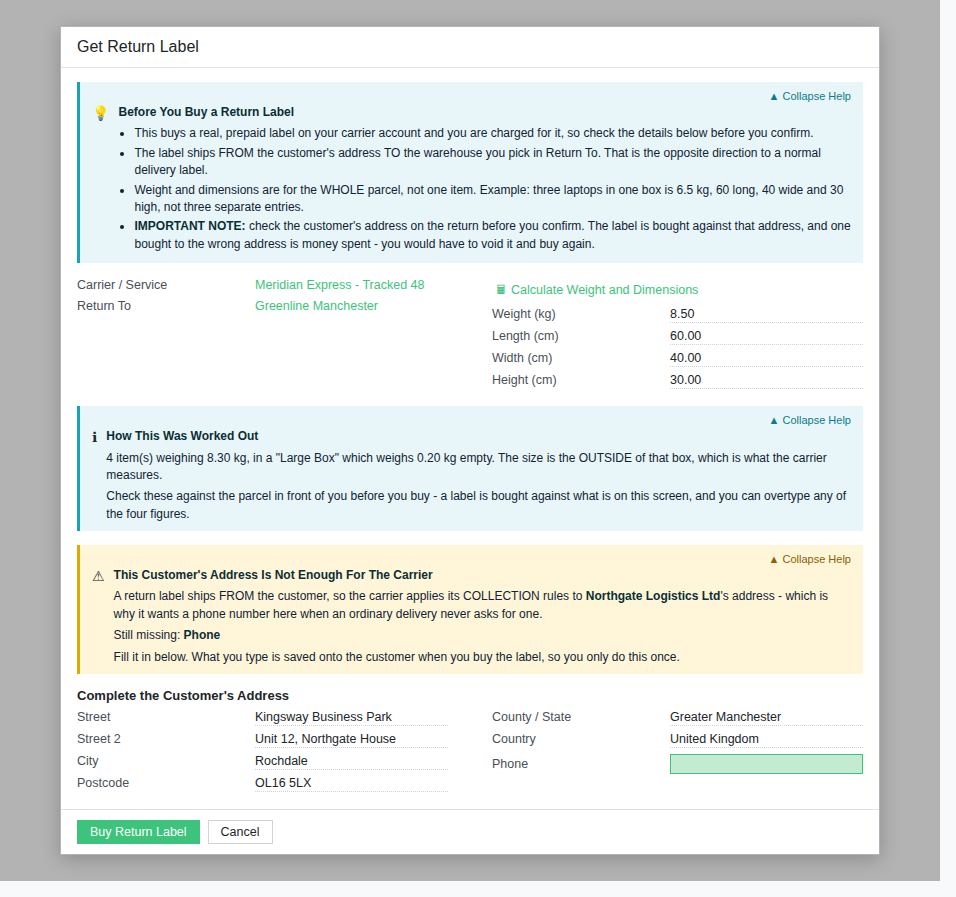
- The direction is backwards compared with a delivery. The label ships from the customer's address to the warehouse you choose in Return To, which is why the carrier applies its collection rules to their address, not yours.
- Weight and dimensions are for the whole parcel, not one item. Three laptops in one box is one entry - 6.5 kg, 60 long, 40 wide, 30 high - not three.
Calculate Weight and Dimensions does the arithmetic, and it runs before a carrier is picked, so Carrier / Service can wait; only the purchase insists, answering Pick a Carrier / Service before buying the label. Nothing is charged until you do. if you press Buy Return Label without one. It adds up the weight of the items, suggests the smallest of your shipping boxes that holds them all, fills the four figures in and says underneath how it got there, including what the empty box weighs and that the size is the box's outside. It also names what it could not do: an item carrying no weight or dimensions is listed rather than treated as weightless, and a return too big for one box is called out, because this screen buys one label. Check the figures against the parcel itself and overtype any of them. The suggestion needs Package Types with Use for Shipping ticked, under Inbound > Configuration > Logistics & Inventory > Package Types - shortened on screen to Configuration > Package Types.
The address the carrier needs is stricter than a delivery address: because the parcel is collected from your customer, a phone number is required. If anything is short, an amber panel names what is missing and a Complete the Customer's Address section opens, Street through to Country plus the Phone. What you type is saved onto the customer when you buy the label, so you only do it once - close the window instead and the typing is lost.
Press Buy Return Label and RecyclyERP fills in Return Label, Label Carrier and Label Tracking Number, then notes the carrier, service, tracking number and cost in the log. A label bought in error is removed with Delete Return Label, which also voids it with the carrier where the service allows; it is restricted to a Settings administrator, because the label has been paid for.
6. No carrier account? Attach your own label
Where no carrier account is connected, Get Return Label is not shown at all. Get the label from your carrier as a PDF and upload it to the Return Label field, which is on the return from Authorised onwards either way. The email attaches whichever label is present, so the customer sees no difference; Label Carrier and Label Tracking Number stay blank, because only a bought label reports those back. Carrier accounts are set up under Outbound > Configuration > Delivery > Shipping Carriers.
7. Making the RMA document your own (administrators)
The RMA document is not fixed: it is an ordinary Word Document Template, like your certificates and delivery notes, so its layout, wording and branding are yours to change. Go to Templates & Documents > Document Templates > Document Templates and find the row named RMA Document, whose System Area is Returns / RMAs.
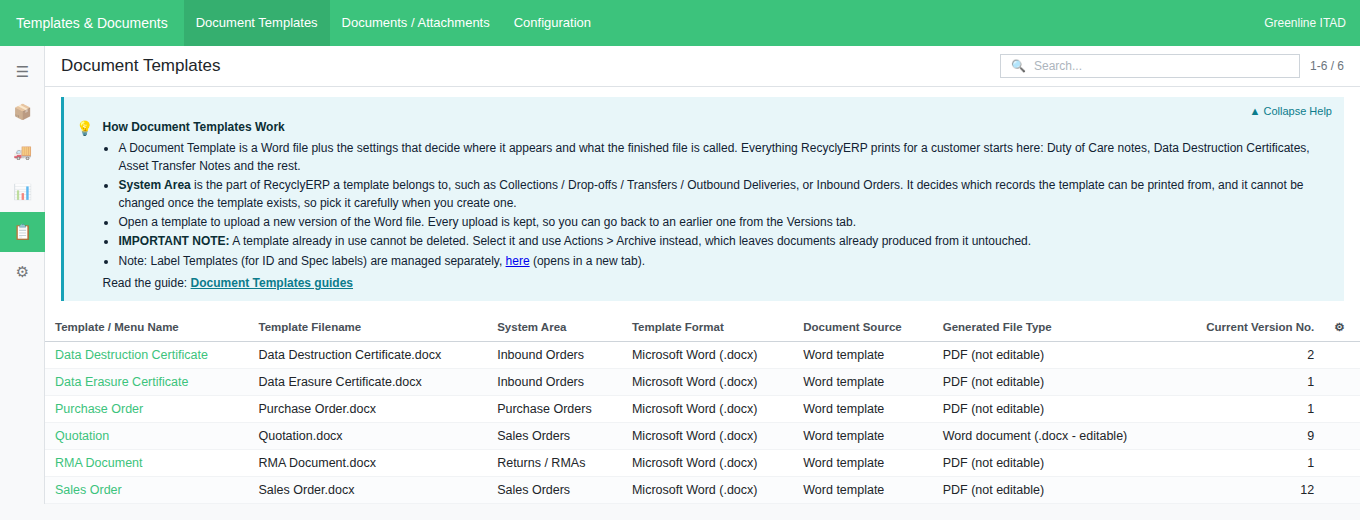
- Put your own layout in. Download the current file from Template File, edit it in Word - logo, typeface, wording - and put it back with Upload new template file....
- Go back if you regret it. Every upload is kept on the Versions tab with who uploaded it and when; click one and press Revert to This Version to put that file back in use. The layout RecyclyERP ships is version 1, so the original is always there.
- Add more to it. The Merge Fields tab builds the code for any piece of data you want, ready to paste into Word.
- Change the file they get. Generated File Type decides whether the finished document is PDF (not editable) or Word document (.docx - editable). It ships as PDF, which is right for paperwork going in a parcel.
An upgrade will never overwrite a template you have customised: RecyclyERP only fills a layout in where there is not one already. Two things are deliberately not allowed - System Area cannot be changed once a template exists, and a template already in use cannot be deleted, so select it and use Actions > Archive instead.
Common problems
- The buttons are not there. The return is still in Draft, or it has been cancelled. Email RMA to Customer and the Documents menu follow the status alone; Get Return Label has two further conditions of its own, below.
- There is no Get Return Label button. Either no carrier account is connected, or the return already has a label on it. Take that off first, with Delete Return Label or by clearing the Return Label field.
- It says Re-send and I have not sent anything. Auto-send RMA email on authorise queued it the moment the return was authorised, or somebody else sent it. The log at the bottom of the return holds the email that went, with who sent it and when.
- It was authorised but the customer never got the email. With auto-send on, a mail problem never takes the authorisation down with it: it is written into the return's log instead. Read the log first - a queued email that has not gone yet looks the same from the return - then press Email RMA to Customer to send it by hand.
- There is a tracking number but no label file. The label was bought and charged for, and the carrier did not hand the file over; the log says so. Fetch it from your carrier account and upload it to Return Label.
- The carrier will not quote. The amber panel names what the customer's address is short of, usually the phone number. Fill it in and press Buy Return Label again.
- A label was bought to the wrong address. Correct the address, ask a Settings administrator to use Delete Return Label, and buy a new one.