Recycly User & Setup Guides
< Back to Article ListMicrosoft 365: Part 2 - Setting up the Outgoing and Incoming Email servers in Recycly
Last updated: 24 February 2026 at 13:07:14 UTC by Dom Tyler
Recycly allows you to configure your system to send emails via your Microsoft 365 account, so that you can send Quotes and Invoices directly from your Recycly system. You can then configure Incoming email to ensure that replies to those emails are captured into your Recycly system
Before You Begin
Make sure you have created a "Recycly User" in your Microsoft 365 account.
See the article Microsoft 365: Configuring a Microsoft 365 User for Recycly Email for how to do this
1. Configure the Outgoing Email Server
To configure your system to send emails via Microsoft 365, first go to Settings -> Outgoing Email Servers

You will see the default Recycly email server. This is used for sending things like password resets so you should not remove this.

Click the New button to create a new Outgoing Server, with the details as below:

The username should be a Microsoft account with permission to send as any email address that you wish to use as a "From" address in Recycly
For the next part of this guide, please make sure you are logged into Microsoft 365 as your new Recycly email user.
This will ensure that Recycly is connected to Microsoft 365 as this user, and not as your own personal Microsoft 365 user.
Now click the "Connect your Outlook account" button. This will take you to the Microsoft App Authorisation screen.

Press Accept to allow Recycly to send emails on your behalf.
Once the authorisation is successful, you should see the small green message shown below

2. Test your new Outgoing Email Server
First we need to check that your email address is set correctly on your user account.
Click your username in the top-right of Recycly and select the My Profile option.

Please check that the Work Email and Email fields are set to either a) the same email address you entered in Step 1 above, or b) an email address that the user is allowed to send as.

One you've double-checked the email address in your user profile, you are ready to test your outgoing email server.
Return to the Microsoft 365 Outgoing Email Server you created in Step 1 above, and click the Test Connection button.

If all is well, you should receive the Connection Test Successful message in the top-right of the system.

Configuring the Incoming Email Server
In Incoming Email Server will allow replies to your emails to be received into Recycly, then Recycly will send out notifications to appropriate external email accounts to let them know that a reply has been received.
To do this, go to Users & Settings -> Settings-> Incoming Email Servers
Click the New button, and fill in the details below (replacing user@mydomain.com with the correct address)
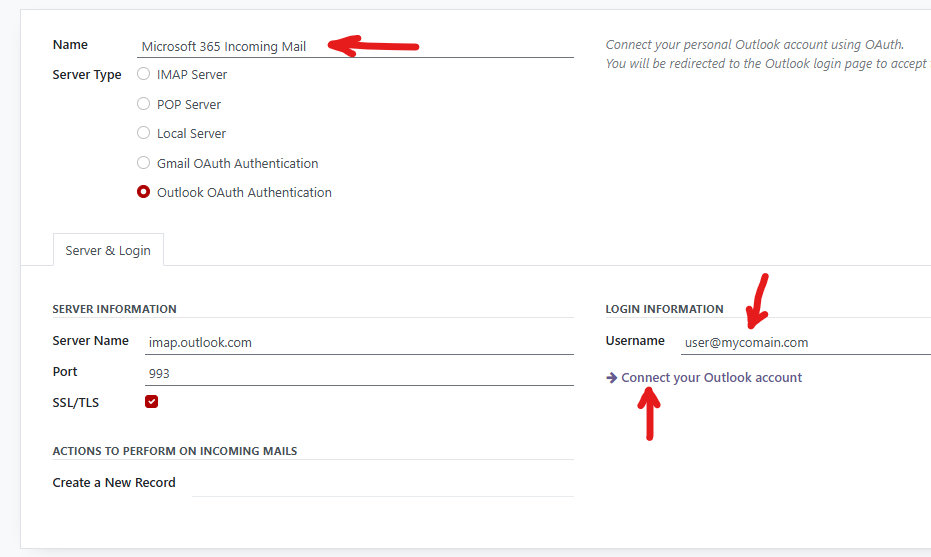
Finally click the Test & Confirm button to check the connection is working
Troubleshooting
This section details the causes and resolutions for some common issues with setting up Microsoft 365 Email Integration.
Error: SMTPSenderRefused: Authentication unsuccessful, SmtpClientAuthentication is disabled for the Tenant
Full Error:
5.7.57 Client not authenticated to send mail. Error: 535 5.7.139 Authentication unsuccessful, SmtpClientAuthentication is disabled for the Tenant. Visit https://aka.ms/smtp_auth_disabled for more information. [DU2PR04CA0037.eurprd04.prod.outlook.com 2023-12-19T13:13:10.269Z 08DBFF48A23204CA]
user@domain.com
Resolution
This error occurs when "Authenticated SMTP" is disabled for the Microsoft 365 user in Microsoft 365 Admin Center
To resolve the problem, click the link above to open the MS 365 Admin Center, then click the user that you are using to send emails through recycly

Click the Mail tab on the user details popup, then click the Manage email apps link.

On the popup that appears, make sure the Authenticate SMTP option is selected, then press the Save Changes button.
This should resolve the "SmtpClientAuthentication is disabled for the Tenant" error.
Error: SMTPDataError: SendAsDenied; user1@domain.com not allowed to send as user2@domain.com
Full Error:
5.2.252 SendAsDenied; user1@domain.com not allowed to send as user2@domain.com;
STOREDRV.Submission.Exception:SendAsDeniedException.MapiExceptionSendAsDenied; Failed to process message due to a permanent exception
Resolution
This error occurs when the email account used to connect to Microsoft 365 from Recycly does not have permission to send as the email address mentioned in the error.
- Go to the Microsoft 365 Admin Center and click on the User or Group that you want to send AS, e.g. if you need to send as sales@mydomain.com, click on that group to open the Details pop up
- Click the Mail tab, then click the Send as permissions link

The next screen shows which users currently have access to send as this account

If the user that you authenticated with Recycly is not in the list, you can add them via the Add permissions button
IMPORTANT: The Microsoft 365 "Send as permissions" setting can take a few minutes to apply, so don't worry if you are still receiving the SendAsDenied error immediately after changing this setting.