Every asset you process is an Item or a Lot in RecyclyERP. This guide shows how to import them from a spreadsheet: new items with their parts - CPUs, RAM and storage devices - items onto an Inbound Order, straight into stock or expected, and changes to items you already have.
Importing is an advanced feature, so some confidence with spreadsheets helps. If you have not imported before, read Importing Data into RecyclyERP: Step by Step (opens in a new tab) first. If you are unsure about your file, email it to support@recyc.ly and Recycly Support will check it for you.
Before you start
- Asset Types, Grades and Processing Actions must already exist, and your file must spell them exactly as RecyclyERP does. Your grades might be called A, B and C, or Grade A, Grade B and so on: Test tells you if a value does not match, and See possible values lists the names RecyclyERP knows.
- Set up a missing Asset Type on its own screen before you import - Asset Types & Services > Asset Types - rather than letting the import create it, so that it has all its settings. Duplicating a similar Asset Type and changing it is usually quickest.
- Every Asset Type has its own name - RecyclyERP will not save two with the same one - so each name in your file matches one Asset Type or none. Spell it exactly as RecyclyERP does: "Desktop PCs" will not match "Desktop PC".
- Manufacturers and Models can be created as you import, as the worked example below shows. Check their spelling first, so you do not end up with "Del" as well as "Dell".
The template
Go to Logistics & Inventory > Items & Lots > Items & Lots, click Import, then click Download an Excel template for importing Items & Lots. Its example rows show a laptop with two storage devices, a desktop PC and a monitor. Delete the columns you do not need, but do not rename the ones you keep.
- Inbound Order - the Job ID of the order the item belongs to, e.g. IB00123. See "Putting items on an Inbound Order" below.
- Asset Type, Lot Quantity (1 for a single item), Manufacturer, Model, Serial Number and Asset Number - the item itself.
- CPU(s)/..., RAM Modules/... and Data Storage Devices/... - the item's parts. The storage device columns can also carry each device's erasure results: Software, Erasure Standard, Processing Action, Processing Status, Erasure ID, Erasure Passes, Erasure Timestamp, Erasure Operator and Erasure Performed By.
- Screen Size (inches), Grade and Processing Action - what you intend to do with the item, such as Resell or Recycle, shown on the item as its Intended Final Action.
- New Item(s) Stock Status, New Item(s) Warehouse and New Item(s) Location - whether the item is expected or already in stock, and where. See "New Item(s) Stock Status" below.
Parts go on extra rows
Each item has one row. Its first CPU, RAM module and storage device go on that same row. Each further part goes on an extra row directly underneath, with the item's own columns left blank: each extra row adds one more part to the item above it.
| Asset Type | Manufacturer | Model | Serial Number | CPU(s)/CPU Model | RAM Modules/RAM Size (GB) | Data Storage Devices/Asset Type | Data Storage Devices/Storage Size (GB) | Data Storage Devices/Serial Number | Grade |
|---|---|---|---|---|---|---|---|---|---|
| Laptop | Dell | Latitude 5490 | DL5490-A1 | Intel Core i5-8350U | 8 | Storage: SATA/SSD | 256 | S4EVNX0M123456 | B |
| 8 | |||||||||
| Desktop PC | Lenovo | ThinkCentre M720q | LN720-B2 | Intel Core i5-8500T | 16 | Storage: SATA/SSD | 512 | 2011E1A2B3C4 | A |
| Storage: SATA/HDD | 1000 | WD-WCC4E1234567 | |||||||
| Monitor | HP | V22i | 3CQ1234ABC | C |
The laptop's second row adds a second 8 GB RAM module to it, and the desktop PC's second row adds a second storage device, a hard drive. The monitor has no parts, so its part columns are left blank.
Worked example: three items with their parts, straight into stock
The file is the one above, with the rest of the template's columns filled in on each item's row: Inbound Order IB00003, Lot Quantity 1, an Asset Number, "CPU" in CPU(s)/Asset Type, the RAM's Asset Type (Laptop RAM (SODIMM) or PC RAM (DIMM)), the storage device's Manufacturer, a Processing Action of Resell or Recycle, and New Item(s) Stock Status "Received and in warehouse" at Main Warehouse, WH01/Stock/Storage Area 1.
1. Load the file
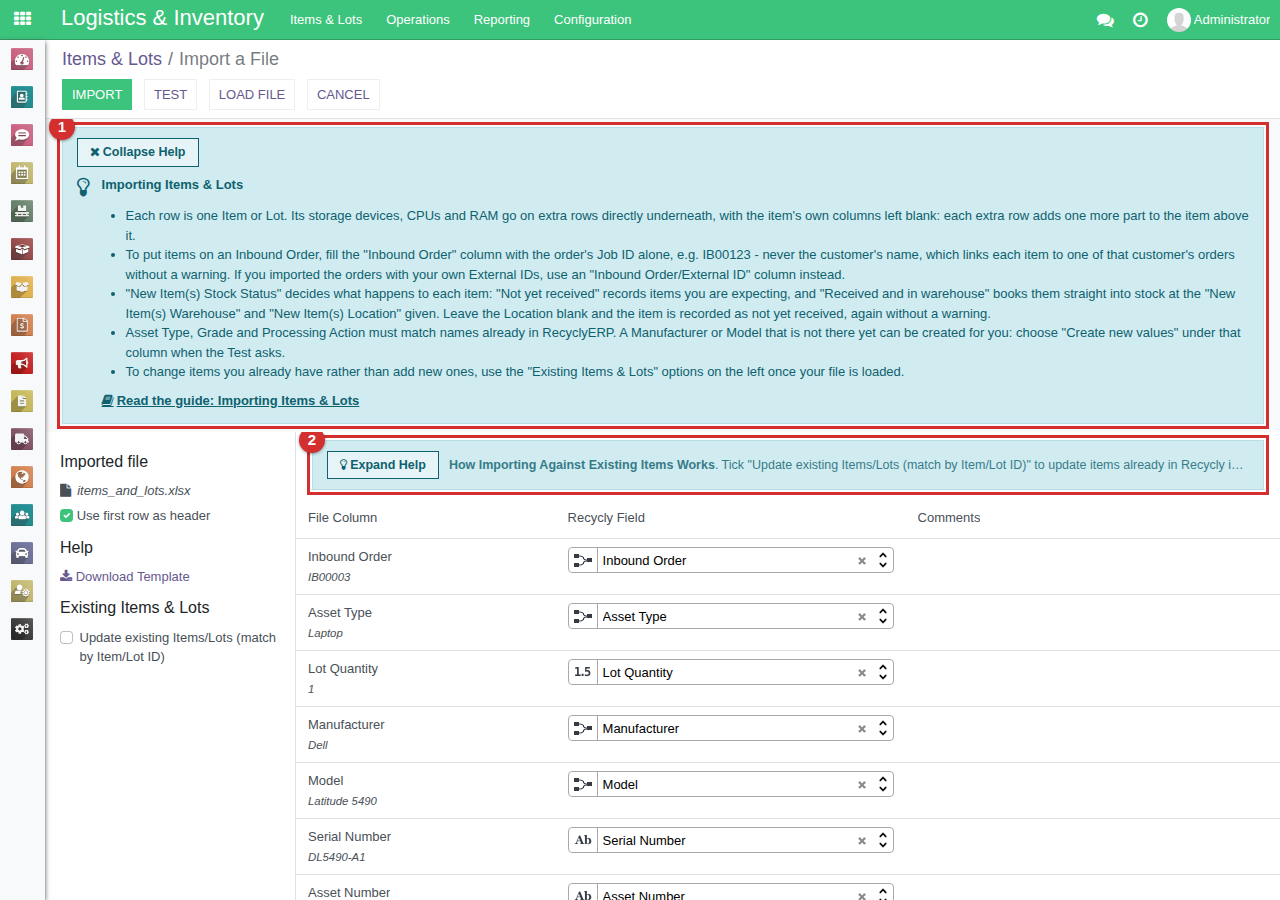
On Logistics & Inventory > Items & Lots > Items & Lots, click Import and load your file. This screen has two help panels: Importing Items & Lots at the top (1), which sums up this guide, and How Importing Against Existing Items Works above the columns (2), for changing items you already have.
2. Check the part columns
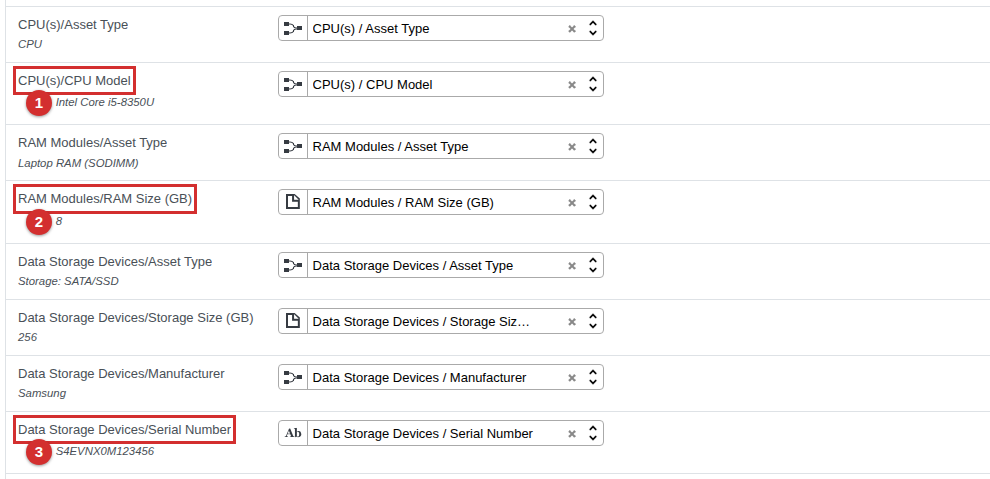
A heading made of the part, a slash, then the part's field - such as CPU(s)/CPU Model (1), RAM Modules/RAM Size (GB) (2) or Data Storage Devices/Serial Number (3) - is matched to that field of the part for you.
3. Click Test, and create the names that are new
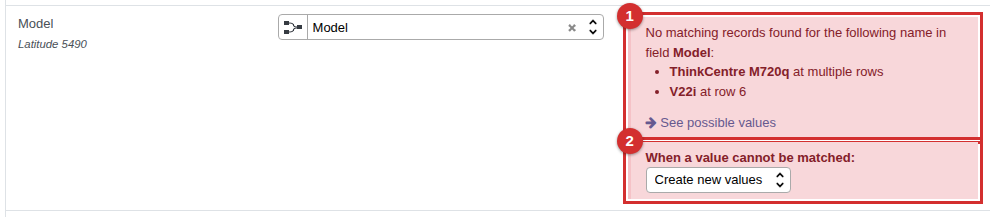
Click Test. Here it finds names that are not in RecyclyERP yet: two Models, two CPU Models and one storage Manufacturer. Beside each column it lists the names it could not find, with their rows (1). Underneath, When a value cannot be matched (2) says what to do about them:
- Prevent import - stop, so you can correct the file. This is what happens unless you choose otherwise.
- Set value as empty - import the item with that field left blank.
- Skip record - leave those rows out.
- Create new values - add the missing Manufacturer, Model or CPU Model to RecyclyERP as the file is imported.
Choose Create new values under each of those columns, then click Test again. IMPORTANT: check the names first. Create new values adds whatever your file says, spelling mistakes included, and a Model created this way is not linked to its Manufacturer. To keep each Model with its Manufacturer, import your Models first, as in worked example 2 of Importing Data into RecyclyERP: Step by Step (opens in a new tab). Never create an Asset Type, a Grade or a Processing Action this way.
4. Import
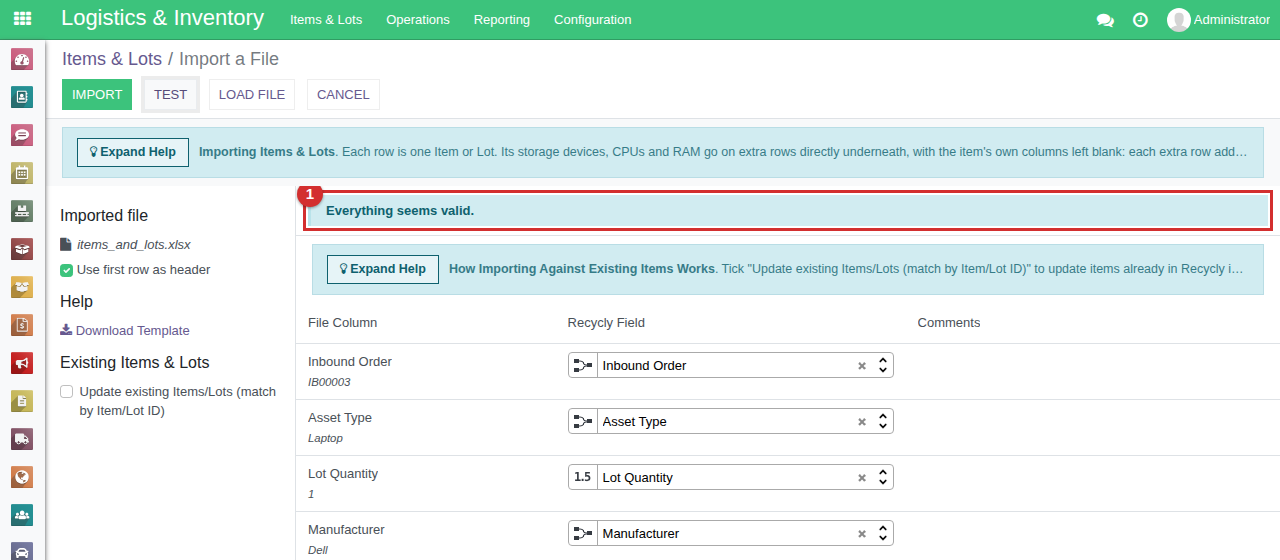
When Test says Everything seems valid. (1), click Import.
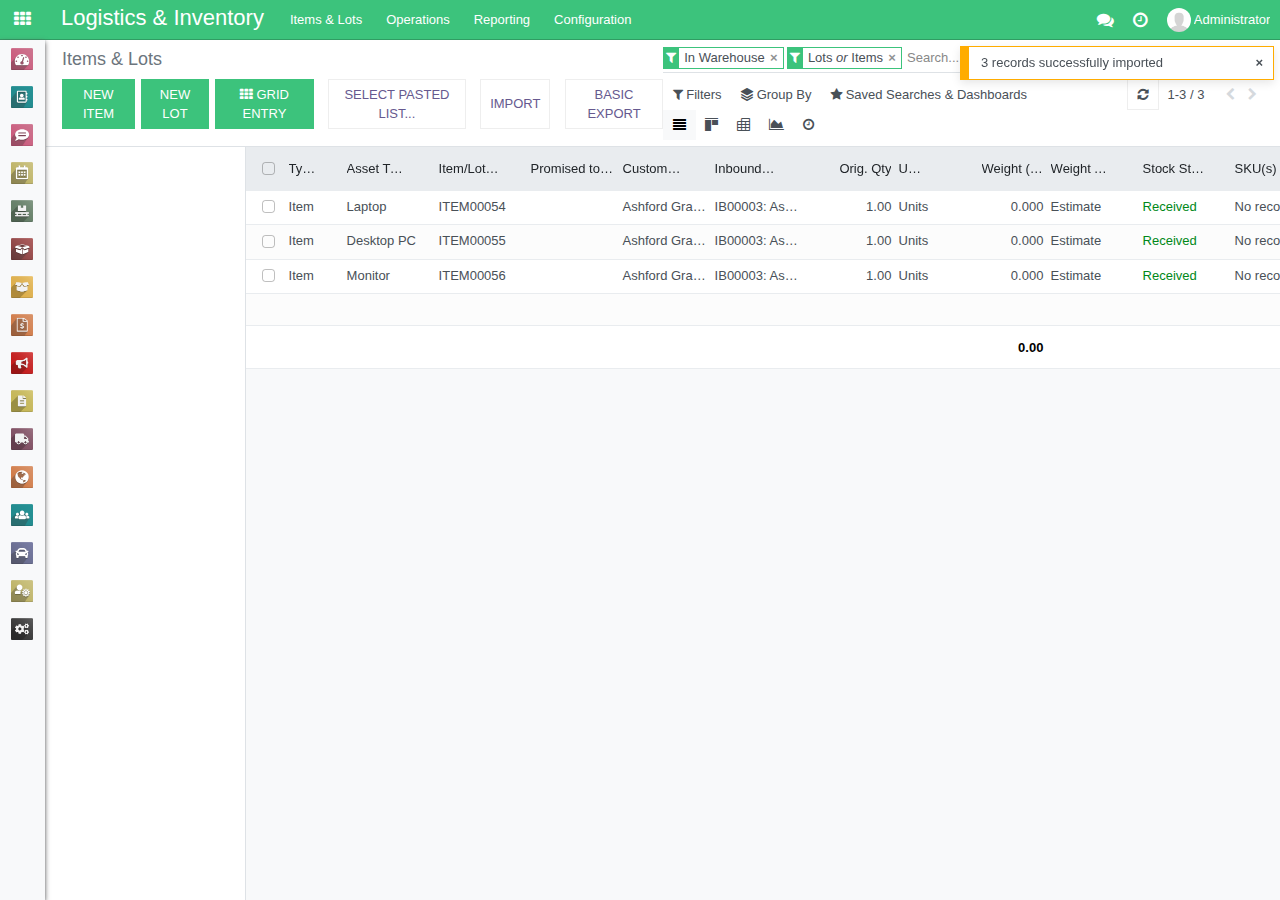
RecyclyERP goes back to the list and says 3 records successfully imported. Each item is Received, because the file said "Received and in warehouse" and gave a Location.
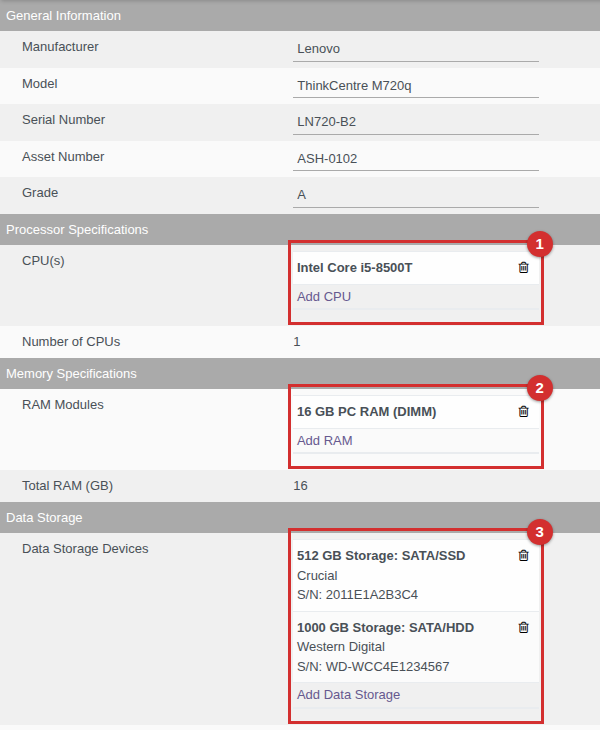
Open the desktop PC. Its Attributes tab shows the details from its row, its CPU (1), its RAM (2) and both storage devices (3) - the second one from the extra row.
Putting items on an Inbound Order
- Fill the Inbound Order column with the order's Job ID alone, e.g. IB00123. Never its full label, such as "IB00123: Ashford Grammar School", which is not recognised, and never the customer's name, which links each item to one of that customer's orders without a warning.
- Importing new orders and their items together, so the orders have no Job IDs yet? Give each order an External ID of your own and name it in an Inbound Order/External ID column instead. Importing Inbound Orders and their Items (opens in a new tab) shows how.
- Adding expected items to one order? Use the Import Items from Excel button on that order's Expected Items tab, and leave the Inbound Order column out.
New Item(s) Stock Status
- Not yet received - for items you are expecting. They are booked in on the order's Collection when they arrive.
- Received and in warehouse - for items already in your building, booked straight into stock at the New Item(s) Warehouse and New Item(s) Location given, e.g. Main Warehouse and WH01/Stock/Storage Area 1. Give the Location's full name, as RecyclyERP shows it. Leave the Location blank and the item is recorded as not yet received, with no warning.
A mixture of asset types
One file can mix asset types, as the example does: an item with no parts simply leaves the part columns blank. If most of your columns apply to only some of your items - storage and erasure details for computers, screen sizes for monitors - you may find it easier to split them into one file for each kind of item, each with only the columns it needs. Shorter files are easier to check, and to fix when Test finds a problem.
Changing items you already have
To change items already in RecyclyERP - here, regrading two of the items imported above - use a file with an Item/Lot ID column holding each item's ID exactly as RecyclyERP shows it, e.g. ITEM00054, and a column for each thing you are changing.
| Item/Lot ID | Grade |
|---|---|
| ITEM00054 | A |
| ITEM00056 | B |
- Load the file on the Items & Lots import screen.
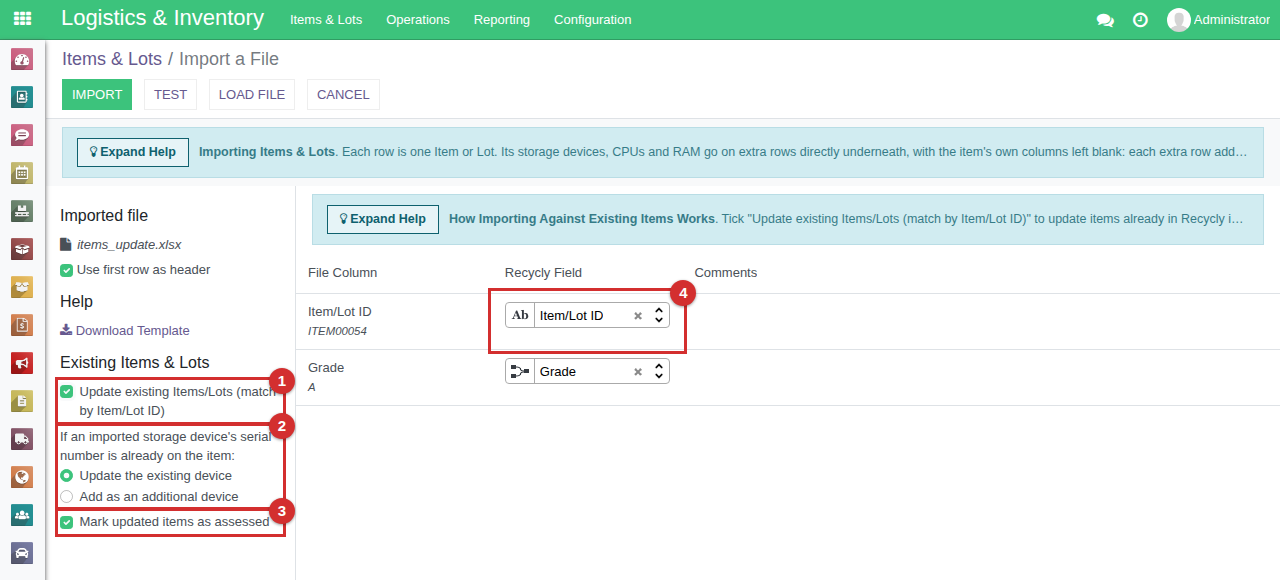
- The Item/Lot ID column is not matched for you, because of the slash in its heading. Click its Recycly Field, type "Item/Lot ID" and choose it (4).
- On the left, under Existing Items & Lots, tick Update existing Items/Lots (match by Item/Lot ID) (1). Two more options appear. The first says what to do when a storage device in your file has a serial number that is already on the item: update that device, or add another one (2). The second, Mark updated items as assessed (3), sets the assessed date on each item you update, so its data status and reports treat it as checked. Untick it if you are not recording checks.
- Click Test, then Import.
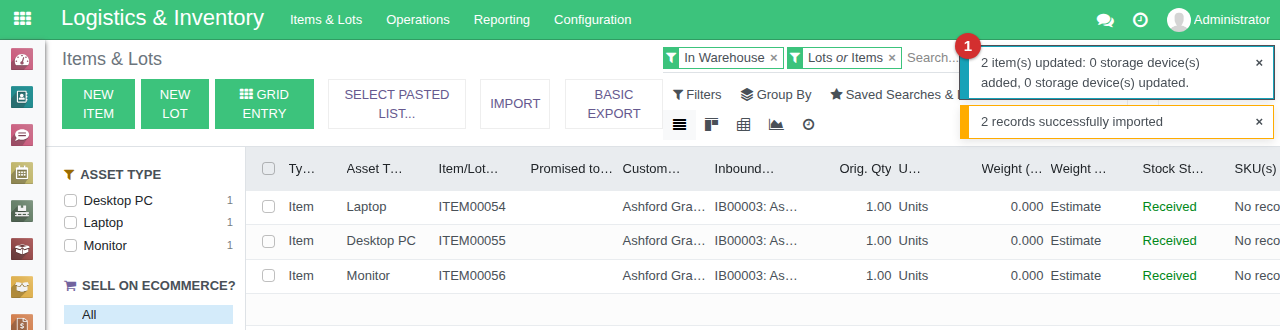
A message confirms how many items were updated, and how many storage devices were added or updated (1).
- If any row's Item/Lot ID is not found, nothing is imported and the rows are listed, so fix the file and try again.
- Storage devices in your file are added to the matched item. Give every storage device a serial number where you can: a device without one cannot be traced on its own on your Data Erasure Certificates.
- To change records in bulk on any other list, see Updating Existing Data using a Data Import (opens in a new tab).
Large files
A file with more than 100 rows shows Batch Import options on the left. Items & Lots go in 100 rows at a time, and never more than 500, so leave Batch limit as it is.
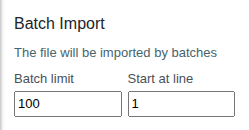
If the import stops part way, the rows already imported stay in RecyclyERP. Set Start at line to the line number the message gives you and click Import again. Never start again from line 1, or those items are created twice.