Recycly User & Setup Guides
< Back to Article ListCreating and Editing Document & Report Templates
Last updated: 13 January 2026 at 10:22:44 UTC by Dom Tyler
Recycly allows you to create and edit Document Templates (Quote, Sales Order, etc.) and Report Templates (Inventory Report, Certificates of Data Destruction) directly using Microsoft Word.
Document Templates can be created and edited in the Documents app, on the Document Templates menu
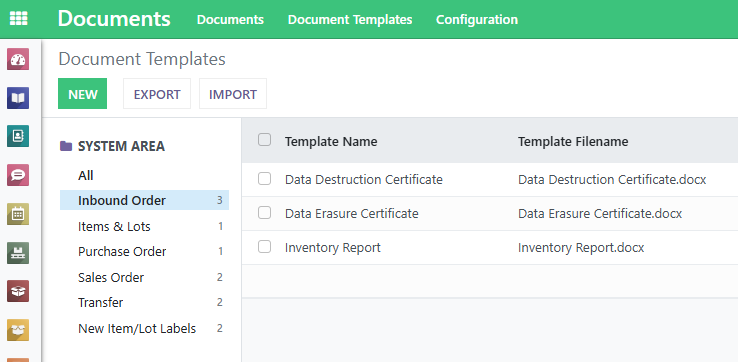
Here you will find the existing Microsoft Word templates, grouped by system area.
Editing Existing Templates
Click on a template in the Document Templates list, and download the current version using the link in the "Template File" field.

You can then edit this template as needed with Microsoft Word

Adding New Recycly Fields to the template
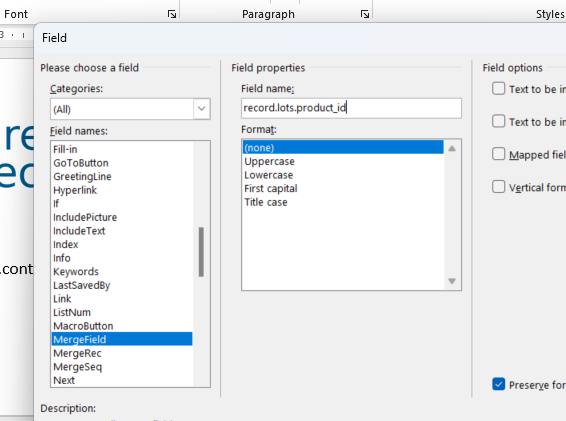
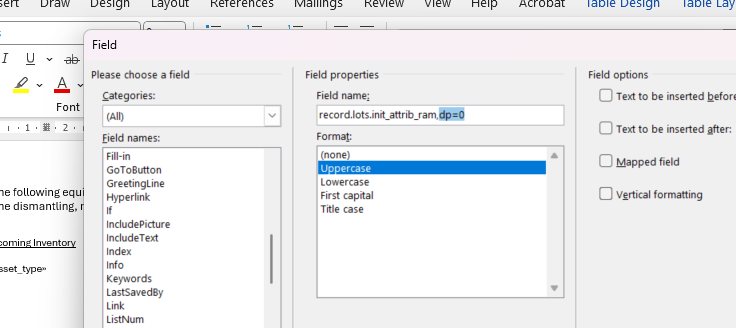
To add new fields to the document, in Word, click on the "Insert" ribbon -> Quick Parts -> Field...

On the screen that appears, in the Categories list select "Mail Merge", and in the "Field Names" list, select "Merge Field".
Finally, type the name of the field you want into the "Field name" field. A method for finding the field name is described in the next section

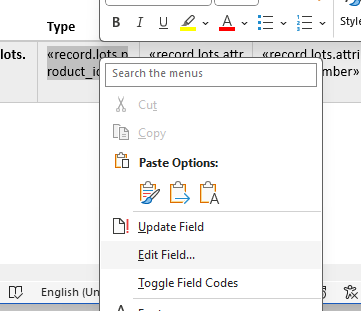
Editing Existing Fields
To edit existing fields in word document templates, right click on the field and use the "Edit Field" option
Finding Field Names
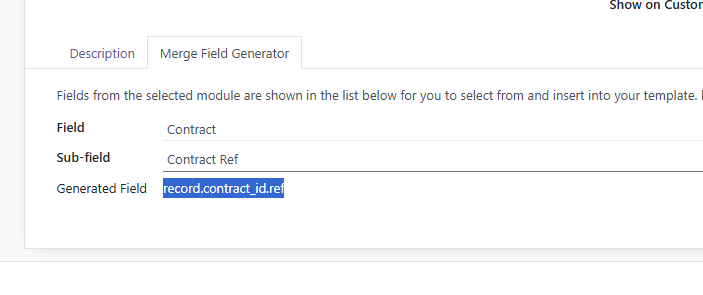
While editing a Document Template in your Recycly system, you will notice a "Merge Field Generator" tab. This tab allows you to generate the merge fields that you can then insert into your Word template. NOTE: You might need to press the Edit button first to be able to select a Model Field.
Uploading New Template Versions
When you have finished editing your template, click Edit on the template in your Recycly system, then press the Upload New Template File button. This will show the following screen:

Click the "Upload Your File" button, and select the Microsoft Word document you have edited.
You should also enter a short description of what you have changed, because the system keeps a history of template changes, to allow you to "Revert" to a previous version if something is wrong with the new one!
Reverting to Previous Template Versions
If you are experiencing an error with a new template version, or you accidentally changed something you didn't mean to, you can "Revert" to a previous version using the "Previous Versions" tab

Click the version you want to go back to and click "Revert to This Version" button.

Note that the system still keeps all the most recent versions too if you then decide to "revert" to a more recent version :)
Adding New Templates
To create new templates, go to the Document Templates area of your Recycly system and click the New button.
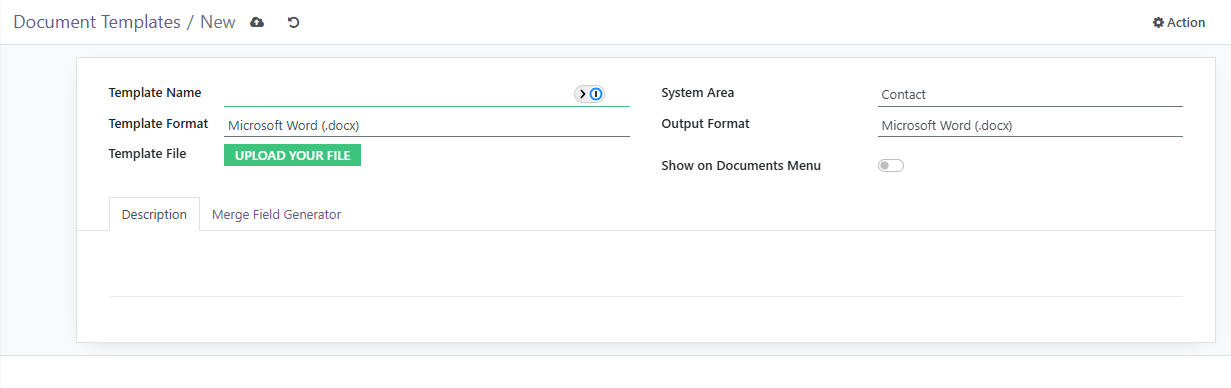
There are 3 things you need to enter for new templates:
- The Name, which is the text that appears on the Print menu for the template
- The System Area which is the area that the template is for, for example "Sales Order" or "Purchase Order".
- There are a lot of options in this list, so speak to Support if you are not sure which one to use! - The Template File, which is the Microsoft Word document to use as a template
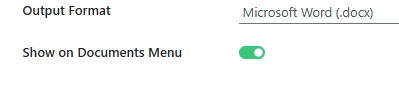
Once you've added your template, use the "Show on Documents Menu" option, to add the template to the Print menu for the System Area you have chosen.
NOTE: After setting this, you may have to refresh your browser to see the new Print option.
The template will then show on the "Print" menu for the system area that you selected:
Formatting Notes
When using tables in word templates there is a "Text Wrapping" option in tables properties. This might need to be set to "None" so that word does not try to wrap text around the table!
It is also worth noting that currently Recycly doesn't use Word's mail merge formatting rules, instead you need to include some additional information after the field name, as described below
Setting number of decimal places for numeric fields
After the field name, add ,dp=2 where "2" is the number of decimal places. e.g. record.amount_total,dp=2. An example of where this could be useful, is the HDD size (e.g. setting the display in generated documents to 500GB instead of 500.00GB).
Note: If for some reason, after pasting your code (e.g ,dp=2) at the end of the Field name, Word displays one or more errors and/or does not accept the code, some users have reported that a workaround is to find a field with a similar code and copying / pasting it into your new Field name. This is an issue with Word, unrelated to RecyclyERP.
Hiding the Time from DateTime fields
To hide the time for DateTime fields, add ,time=0 after the field name, e.g. record.date_due,time=0
Adding the Current Time & Date
If you are outputting to an MS Word document, then you can use word's built in Date and Time fields.
However, if you are outputting to PDF, then you can use the current_date and current_time merge fields (these will be formatted as per your current user preferences)
We will be improving the usability of the above over time!
Further Information
We’ll be adding further information, and working on the usability of this feature over time, in the meantime get in touch if you have any specific questions.